This time, we’re going to talk about How To Fix A Leaking Faucet In The Sink. There is a lot of information about Kitchen Sink Leaking Underneath on the internet, of course. Social media are getting better and better quickly, which makes it easier for us to learn new things.
how to fix a leaky faucet in kitchen sink and How To Fix Leaky Faucet Handle are also linked to information about Faucet Dripping After Water Turned Off. As for other things that need to be looked up, they are about how to fix a leaky faucet under the sink and have something to do with The Most Likely Fixes for Leaky Faucet.

86 Reference List: How To Fix A Leaking Faucet In The Sink | how to fix a leaking faucet in the bathroom sink
- To disassemble the faucet, first remove the decorative cover and unscrew the handle. Then, remove the cap, cam, and seal with pliers. Finally, remove the inlet seals and springs within the mechanism with needle-nose pliers. - Source: Internet
- It’s important to perform an inspection of the faucets in your household once a year to confirm if they are leaking. According to the Environmental Protection Agency, a leaky faucet can waste 10,000 gallons of water each year. In an average household, a leaky faucet will waste 10 drops of water per minute. While a majority of homeowners do not view a minor water leak as an emergency, a dripping faucet may waste up to 347 gallons of water each year. - Source: Internet
- Lay the pieces out and inspect each one. Look for tears, cracks, dirt, and grime. Check for damages to the O-ring seal, as this is a typical reason why kitchen faucets leak at the spout. - Source: Internet
- At some point, we have all heard that troublesome drip, drip, drip coming from your bathroom or kitchen. Even the smallest of faucet leaks can have a major impact, wasting up to three gallons of water a day. For the sake of your water bill (and our planet!), it’s time to fix that drip. While a plumber is an easy go-to solution, doing it yourself isn’t as daunting as you think. - Source: Internet
- Next , use the hardware that came with your new faucet and your basin wrench to attach the new faucet to the sink. Connect the new hoses to the water lines coming from the wall, using your plumber’s tape wherever two hoses are joined. Make sure all your hardware is tight, and then turn the water back on by turning the shutoff knobs counter- clockwise. - Source: Internet
- This faucet even has removable valve seats that unscrew and could be replaced if that was the cause of our faucet drip. But again, I’m going to say that locating the right parts and going to all those lengths is probably going to be too slow and costly for most folks to even consider doing just to fix a leak. Thankfully, as you can see below, our valve seats were still fine for a few years good service, so I only had the tap washers to replace. - Source: Internet
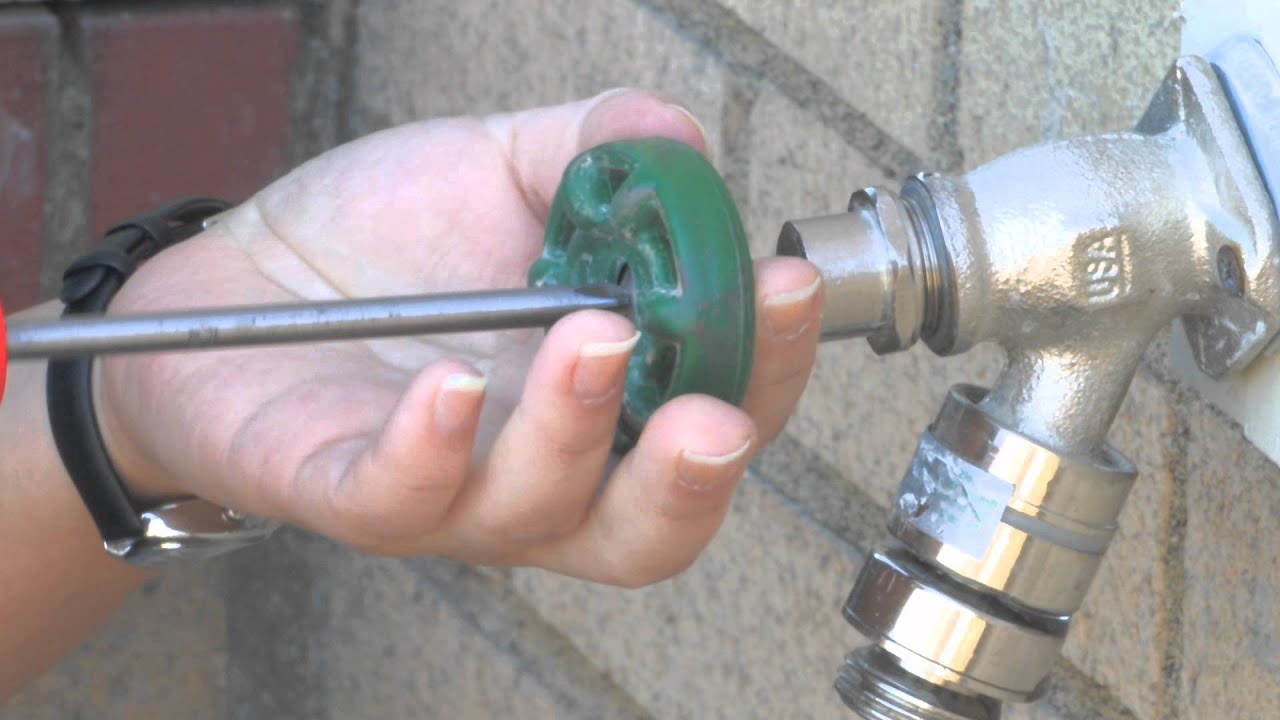
- Once the water has been shut off, start by removing the faucet handle. To do this, find the small set screw located somewhere near the bottom or back of the handle. Every brand is different, but these screws are often hex screws, so you might need the correct size Allen key to unscrew it. When the set screw has been unscrewed, lift the handle up and remove it. - Source: Internet
- As older bathroom and kitchen faucets work pretty much the same way, they can each need some repairs over time, especially replacing their sealing washer. And it’s a lot more sustainable and cheaper to repair a faucet than to throw it away and buy and install a new one. The other advantage to fixing an older faucet is that older ones are often made better than the newer ones, and they may also fit with the style of your original bathroom fittings. that’s pretty important if they are pink or avocado colored! - Source: Internet
- A corroded valve seat may also be the culprit when it comes to a faucet dripping water. The valve seat is the connection in the compression mechanism that the valve / cartridge seats against. The older seats were made of brass and could be resurfaced and made new again. but that’s not the case with the new plastic seats. You have to replace the entire unit. - Source: Internet
- If, after all of your hard work, you notice the leaky faucet is still dripping, then the cause may be corrosion in your valve seat. If not cleaned over time, it can produce leaks near the spout. Other potential problems are worn-out seals, loose parts, or, even worse, broken plumbing. - Source: Internet
- If it doesn’t spin freely, you’re probably turning it the wrong way, so try giving it a spin the other way. On the image above and below you can see the ‘clockwise to close’ faucet cartridge mechanism with all the old grease and gunk on there. On my faucet, this is the left hand hot water side. - Source: Internet
- Once the holding screws are removed, carefully pry the top of the faucet up and off the tap cartridge using equal pressure on both sides. Some cartridges have a splined top (like those seen here). Some are square, and I’ve even seen pentagon and hexagon shaped tops, depending on the brand. - Source: Internet
- To fix a dripping compression faucet, you’ll need to access the internal parts of the faucet. Start by taking off the faucet’s handles by removing the set screws located near the bottom or back of the handles. Then, use a screwdriver to loosen the screws holding the handle in place. - Source: Internet
- You can tell a disk faucet from a ball faucet once you disassemble it. If you find two disks inside the mechanism instead of a ball, you have a disk faucet. Here’s how to perform a leak repair: - Source: Internet
- If the water is coming from the spindle (or body of the tap), I’ve some bad news for you. This normally shows that your faucet has perished or torn O rings in it - often caused by a corroded faucet cartridge body. In this case it is still possible to fix a leak, but I would recommend replacing the entire faucet cartridge rather than trying to replace the ‘O’ rings themselves, as whatever caused them to rip and leak in the first place will probably cause it to happen again. Also, it’s quite a fiddly and hard task replacing O rings; it can be tricky to find the right size of rings, and a whole new cartridge body for a traditional tap with a washer is only around $7-10 per side. - Source: Internet
- The cartridge in a faucet - which contains the mechanism to turn the water on (and hopefully off) - is screwed into the body of the faucet itself, and there are two of them in a two-handed tap, one for hot and one for cold. Ideally, you will have a suitably-sized spanner that fits the nut-shaped top of the cartridge. If not, you can use a pair of plumbers grips like I did, but be sure to adjust them carefully on the slide so they close to the right size, and put it them the right side around so that the harder you pull, the tighter they grip. Below is the correct way to have plumbers pliers positioned to loosen a right hand thread (which is 99% of them). - Source: Internet
- First, the wrenches—you’ll need a crescent wrench as well as a faucet wrench. And while not always necessary, a faucet or basin wrench will make it much easier to reach the nuts that hold your faucet together, and one usually costs about $10, so worth considering. Plumber’s tape (also called thread seal) is another good item to have on hand; it will allow you to make the connections on your plumbing water-tight. You’ll also need a flashlight, as the space under your sink is undoubtedly dark and cramped. Being able to see will help you avoid a damp surprise. - Source: Internet
- Due to the hard water we have in Mohave County, particles often make their way into home plumbing systems. The minerals in hard water cause issues for plumbing fixtures like the kitchen sink. There are two common faucet spout leaks: temporary and constant. - Source: Internet
- Alternatively, you can go online and buy a big assortment pack of new tap washers ahead of time and some food grade silicon grease, as this saves having to run out to the store mid-job. But, it also means you’re going to have to plan ahead for your dripping faucet repair. You’re going to spend more money, and you’re going to have to store 100’s of rubber washers in the hope that one day they will come in handy (and that you can remember where you put them and that age didn’t make them go hard!). - Source: Internet
- Fitting the repaired cartridges with the tap mechanism is the opposite of removal but easier, as they aren’t all stuck in years of sink-gunk. Just remember, if working on a quarter turn faucet to put each side back where they came from, and to turn the plumbers grips over so they grip harder the tighter you screw the cartridge back into the faucet body. (see image below) - Source: Internet
- Before you attempt to fix a leaky bathroom or kitchen faucet, turn off the water by twisting the water shut-off valve mounted below the sink. Then, plug the drain with a stopper or rag to prevent small parts from falling down the drain. Now you’re ready to begin. - Source: Internet
- If you’re also replacing the faucet, you’ll need to remove the old one. On many kitchen sinks, this is where a basin wrench is handy, because the nuts holding the existing faucet onto the sink are behind the sink basin, under the counter between the basin and the wall, and good luck reaching them . Once those nuts are undone and the hoses are disconnected, the existing faucet should simply lift out. Then, making sure to use thread seal tape wherever there’s a connection between hoses, you can attach the hoses to the new faucet and thread them through the holes in your sink. This step will let you avoid having to tighten these connections in the tight quarters behind the basin. - Source: Internet
- As you remove various parts and pieces, try to keep track of them. Lay them out in the order they were removed or take a video of the process. This will make reassembling your faucet much more manageable. - Source: Internet
- The sealing washer in the end of the cartridge is usually held in with a brass Bibb screw, which needs to be unscrewed, and do so very carefully. They don’t take much force to break as brass is quite soft. Occasionally they are stainless steel like this one, which was an unexpected suprise. This faucet must have been of a superior quality at its time of purchase I reckon, making it even more worth repairing and saving. - Source: Internet
- To disassemble the faucet, first unscrew the handle. If you see a retaining clip holding the cartridge in place, remove it with pliers. Remove the faucet spout and the O-rings underneath. - Source: Internet
- Next, pull out the stem. Now, you should be able to see the O-ring and seat washer. Take a moment here to examine the O-ring. If it looks worn or cracked, replace the O-ring while you have the sink disassembled. - Source: Internet
- Helpful tip: find a heavy guage steel washer that is bigger than your faucet sealing washer, and check the rubber washer for irregularities on the edge before fitting. When I got to this stage and tried to get the sealing washer to fit into the cup in the tap mechanism, it simply didn’t want to pop into its place. And when I looked closely there was some excess rubber from the molding process, so I found it helpful to carefully trim this off with a very sharp knife. Be very careful with sharp knives people. - Source: Internet
- To disassemble the faucet, first remove the escutcheon cap. Then, unscrew the faucet handle and disk cylinder to expose several neoprene seals. Pry out the seals, and if they’re worth saving, soak them in white vinegar. If the seals are worn out, replace them. - Source: Internet
- Whatever you use, when you start to unscrew the tap cartridge it’s a great idea to put equal and opposite pressure on the spout of the faucet to prevent putting too much pressure on the porcelain sink bowl. And you may need to use a reasonable amount of force to move the faucet cartridge if it hasn’t been unscrewed in many years. I’ve learned to position plumbers pliers close enough to the spout so I can squeeze the plier handles and spout together to free them off without forcing anything. - Source: Internet
- If you suspect a leak, place a dry paper towel or cloth underneath the spout. Let it sit for an hour or longer. If the towel is wet when you check back, you may have a leaky kitchen faucet that needs repairing. - Source: Internet
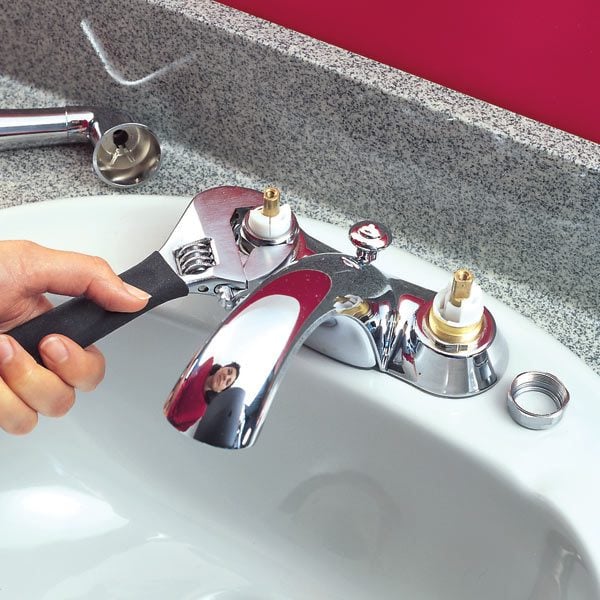
- Step 3: Use your wrench to loosen the packing nut. From there you should notice the stem. Remove that as well. Depending on the faucet, some stems pop right off, while others twist off from the valve. Check the removed parts for any damage. - Source: Internet
- Ball faucets are usually found in kitchen sinks. They have one handle with a ball at the base that rotates around. Here’s how to fix a leak: - Source: Internet
- If you encounter a more persistent leak (or if you want to replace rather than repair your faucet), you’ll need to shut off the water before taking the next step. The shutoff valves are usually located under the sink, and are often oval in shape. There should be two—one for hot water and one for cold water—and they will most likely be located under the sink basin, against the wall. To stop the flow of water, turn the handles clockwise. - Source: Internet
- Once the stem and packing nut are disassembled, you will see a rubber seat washer. To fix your leaky faucet, you should remove the seat washer from the base of the stem. Next, drive to your local hardware store to purchase a new rubber washer for your sink. Install the seat washer in the compression sink and apply a layer of neutralized heat resistant solvent. - Source: Internet
- Before you start the faucet repair, turn off the water from the main supply. The last thing you want is to experience an instant flood as soon as you disassemble it. Once you have turned it off, find the fixture shutoff valves below the sink if it has any. Turn on the faucet to verify whether the water has been shut off. If there is no water coming out of it, you can cover the drain using a stopper or a cloth. - Source: Internet
- Take defective parts to your local hardware store and get replacements. Don’t be afraid to ask for assistance to ensure you receive the correct parts. If you know your sink brand and model, the easier it is to find the right replacement pieces. - Source: Internet
- Turn the water back on at the shut-off valve and inspect for leaks. Turn on the water in the sink to make sure things are running properly. If you tightened everything enough, you’re all done. If you don’t have a water sensor underneath your sink, you may want to check back in a few hours to make sure that there is no leak and that everything has been snagged up properly. - Source: Internet
- If you need support with a dripping faucet, give our team a call by phone at (904) 217–5694. Our team of licensed plumbers provide fast and trusted plumbing and HVAC services for faucet leaks, burst pipes, inefficient air conditioners, broken water heaters, gas leaks, and noisy furnaces. We offer plumbing and HVAC solutions in areas of Florida such as Jacksonville, Atlantic Beach, Saint Augustine, and Fleming Island. - Source: Internet
- Constant leaks continue even when the sink is off. These persistent leaks develop from mineral or dirt accumulation in the sink valve or cartridge. The buildup wears down the piping and prevents the faucet from shutting off water flow. - Source: Internet
- We will cover the essential tips for repairing a sink leaking from the base of the spout. But specific brands may provide more detailed instructions that can be helpful. A brand’s website can also supply model numbers in case you need to order a new part. - Source: Internet
- Fit a new O-ring and stem washer onto the stem, maintaining the same positions as the originals. Apply water- and heat-proof grease to the washer and O-ring. Thread the stem back into the retaining nut, then install the stem assembly into the faucet body and install the handle, reversing the disassembly process. Turn on the water supply at the shutoff valves and check the faucet operation. - Source: Internet
- An ordinary cause of a leaky compression faucet is a damaged seat washer. To fix the dripping faucet and other plumbing problems, you will need to disassemble the cover on the handle of the sink to remove the seat washer. Next, unscrew the handle. You should see a packing nut and stem connected to the kitchen or bathroom sink. Apply a wrench to remove the nut and detach the stem. - Source: Internet
- Start with the harder-to-reach thread, likely the one that connects to the faucet. Thread it at first with your hands, then use your adjustable wrench to snug it tight. Because of the rubber gasket inside, I was told there was no need for Teflon tape. You should ask when you purchase your flexible hose if it will need plumbers tape or not. - Source: Internet
- If you try to fix your leaking faucet to no avail, the next call you should make is to Mr. Rooter®, an authorized company of The Dwyer Group®. Whatever you do, don’t let a small leak become a big leak, or you could face detrimental water damage. Fortunately, if you need help recovering from a flooded home, Rainbow Restoration® is here for you. - Source: Internet
- Now turn your attention to the bore in the faucet cartridge body. This wants to be clean and free of pitting or damage as the O-rings need to fit properly in there or the faucet will leak from up under the tap handles and dribble constantly down and around the faucet base. Thankfully on ours this wasn’t the issue, ours was simply difficult to turn off so it constantly dripped water. - Source: Internet
- Dirt is one of the leading causes of faucet leaks. Once you have made the replacements, you can soak the valve seat in white vinegar for an hour. Use a scouring pad to clean the surfaces so that they come out looking shiny and smooth. After, take out the stopper from the drain to sprinkle clean water over the valves. - Source: Internet
- Temporary leaks occur when the sink is in use. These leaks are most prevalent in fixtures with dirty or worn-down O-rings, the seal at the faucet base. According to Fluid Power World, O-rings are the most common fluid power seals for preventing leaks. - Source: Internet
- So, now that you’ve finished your DIY fix for a leaking faucet, it’s time to turn the water back on and to check for any drips or leaks. I always recommend checking around carefully after carrying out any plumbing work. As I mentioned earlier, nothing causes more damage in a home than water dripping where it shouldn’t be, which can include inside walls in the case of air leaks with interstitial condensation, or under windows where cold weather and high humidity causes condensation. - Source: Internet
- And give everything a really good clean while you can get to it. Usually this part of the faucet is hidden under the tap handle and is encrusted with soap and old toothpaste. Nice. - Source: Internet
- If that doesn’t work, you will need to replace the flexible hose under the sink. Make sure that the hose is leaking and not coming from the tap of the sink or elsewhere. Lay some paper towel down on the bottom of the waterline and see where the water is coming through—next, check the water supply line to see if the water is coming out. - Source: Internet
- Your faucet’s pieces are squeaky clean, and all damaged components have been replaced. Now it’s time to reassemble your fixture. This is where you should use your video or the sink model’s diagram to ensure everything is put back together correctly. - Source: Internet
- Water damage is no joke, so if this is the case, call for backup. Professional plumbers have specialized equipment to detect water leaks. Let the experts take over to ensure your kitchen sink gets fixed once-and-for-all. - Source: Internet
- Remove the screw securing the handle to the stem of the faucet using a screwdriver; you may have to pry off a decorative cap on top of the handle to expose the screw. Pull off the handle from the stem. If it’s stuck, use a faucet handle puller (available at hardware stores) to remove the handle. - Source: Internet
- Step 2: Remove any decorative parts of the handle knobs. A simple prying with a flat-head screwdriver will take care of that. Underneath each knob, there will be a screw that mounts the handle to the stem. Unscrew, then gently remove the handle with your flat-head. Using penetrating oil can assist in loosening it, allowing you to take the faucet handle off the stem. - Source: Internet
- Disassemble the rubber seats and springs and replace each component. Once you are finished installing the spring, insert the adjustable steel ball in the ball faucet. Lastly, install a new cam cap and gasket directly above the steel ball. Next, secure the cap assembly to the kitchen or bathroom sink and apply a wrench to attach the nut to provide optional tension against the adjustable ball. - Source: Internet
- Whether you have a slow leak or are just looking to spruce up your kitchen, updating your old faucet can help conserve water and make your kitchen more efficient. Though handling the job yourself may seem intimidating, it’s totally doable, and it will pay dividends in the form of lower monthly bills and avoiding a potentially costly repair down the road. Here’s how to get started. - Source: Internet
- Most cartridge faucets are one-handled. The water pressure adjusts by pulling the handle up and down, while the temperature adjusts from left to right. Here’s how to fix a leaky cartridge faucet: - Source: Internet
- Plumbing By Jake is here to help with all of your Arizona leaky faucet repair and water dripping needs. Call us at (928) 377-5910 or enter your info into our online contact form. A qualified technician will reach out to discuss how to stop your kitchen faucet from leaking. - Source: Internet
- So that you don’t have a major flood, the first step to repairing a dripping faucet is to turn off the hot and cold water supply lines. Hopefully, whoever fitted the original faucet also thought to fit shut-off valves on the hot and cold supply lines leading up to the sink (see below). Our faucet had 2 different types, the one on the left is a ball valve that just takes a quarter turn to shut it off, the right hand one had to be wound down until the water stopped. Once you think the water is off, turn your faucet on - both hot and cold - and make sure that no water is flowing after the initial pressure is released. - Source: Internet
- Use your finger to feel the valve seat inside the faucet body. If the seat surface is gouged or feels rough, you may be able to replace it with an exact replacement. Use a seat wrench to remove the old seat and install a new one. If you can’t replace the seat and the faucet still leaks after replacing the stem washer and O-ring (step 7), you may need to replace the faucet. - Source: Internet
- The faucet in your household may be dripping due to a malfunctioning or loose seat washer. Since a sink is utilized on a daily basis, it is not uncommon for a seat washer to become loose from continuous use. As a result, your sink will drip water while it’s not being used. If you have a newer faucet in your house, you may be required to replace the plastic cartridge or seat to eliminate an expensive water leak. - Source: Internet
- The good news is kitchen faucet repair is our specialty. If you have questions about water leaks in your kitchen sink, call us at (928) 377-5910 or complete our online form. One of our team members will get in touch and get started on our kitchen sink repair process. - Source: Internet
- Thankfully I happened to have a tool to fit this in my toolbox, but many faucets have simple slot drives or Philips head screws. Whatever you have, find the right screwdriver and unscrew the fixing out of the top of the faucet cartridge. You should also probably wear some disposable gloves to keep grease off your hands as things are going to get messy shortly. - Source: Internet
- A valve seat is a component that is located directly beneath the cartridge. As the valve seats in your sink reach the end of their life cycle, rust and corrosion may begin to form. If you have an old plastic seat, you should replace it to fix your dripping faucet. - Source: Internet
- On some faucets the screw holding the tap top or lever in place is hidden under a cover that has the blue or red color on it to denote hot or cold. This will have to be carefully levered off first. On our faucet, the screw was apparent, and it had a star shape or ‘Torx’ head, a type of screw drive characterized by a 6-point star-shaped pattern, developed in 1967 by Camcar Textron and mostly used on vehicles. - Source: Internet
- Once everything is as clean as possible, it’s time to use some of that waterproof grease I mentioned. Now, as the faucet I was repairing at the cabin only has water going through it from our rainwater recovery - which we’d be unwise to drink due to it likely containing mouse, bat and bird poop plus pine needles - I used regular waterproof grease as it was on hand. However, for most faucets you really need some food-grade silicone grease to be safe. - Source: Internet
- If your leak continues, it’s the right time to call in a professional to fix a leaky faucet. If your problem is more than a simple faucet repair, our company’s professional plumbers can diagnose the issue and resolve your problem for long term. While a plumber is looking at the fault you need to turn off the water supply. - Source: Internet
- Until I looked it up, I didn’t realize that a very typical leak of 10 drips per minute wastes around one gallon of water per day, or 32 gallons per month. But as our ancient faucet was becoming mighty difficult to fully shut off, I started to wonder about those taps that leak a lot more. Well, I was shocked to learn that a faucet leaking 60 drips per minute (like ours) wastes around 5 gallons per day, or 150 gallons of water per month… and when you have to drive 3 miles up and down a track to go find more, those drops of water are definitely worth saving! - Source: Internet
- No matter what type of faucet you have, you should begin each faucet repair project by shutting off the water at the supply valves under the sink. Turn both valves clockwise to shut the water off. After you’ve done this, make sure you open up the faucet to release any excess water and pressure still left in the line. You’ll also want to close the drain, just in case any small but essential pieces drop into the sink. - Source: Internet
- Sometimes, it’s best to let a professional fix your leaky faucet. If you rent your home or apartment, call your landlord for advice. Attempting a DIY repair may violate your lease, so you should let the maintenance team handle it. - Source: Internet
- Not everyone was born to be a plumber. The complexity of fixing a leaky faucet for bathtubs, sinks and even taps may compel you to seek the assistance of a plumber. But what happens when you stay in a remote area or don’t have the money to pay for the service? Obviously, you will need to do it on your own. Remember, the seven DIY steps will temporarily fix the problem. But you will still need an expert to repair, replace, or maintain these parts. - Source: Internet
- One common item to investigate when a sink faucets leaking is the O-rings. An O-ring is a small rubber ring located around the valve stem. These can become loose or damaged over time through the regular use of your faucet. If your O-ring is the problem, you may be seeing leakage from beneath your faucet’s handle. If this is the case, a simple O-ring replacement is all that you need to do. - Source: Internet
- It’s happened to almost everyone whose home is more than 15 years old: You go under the kitchen sink to get something you haven’t needed for a long while and you notice a weird odor. Or maybe a dark stain on the cabinet floor. Or a container that has water in it when it should not. - Source: Internet
- Remember that heavy guage steel washer I mentioned above? Well, this is where that becomes very useful. My new rubber sealing washers were a really snug fit, and despite much s̶w̶e̶a̶r̶i̶n̶g̶ pushing, they wouldn’t go in straight, which wasn’t going to stop that faucet from dripping. My solution can be seen below - by using the steel washer temporarily and winding in the screw, this forced the rubber seal into the cup. - Source: Internet
- Once you have the correct tools, shut down the water supply. Turn both handles until they are completely off. Locate your sink’s water supply valve and turn it off. The valve should be in the cabinet below the sink. - Source: Internet
- Also, when repairing these older quarter-turn faucets, remember to keep the left and right (hot and cold) sides seperate, as they operate in opposite directions. You really don’t want to mix them up at this point, or your newly repaired and non-leaking faucet will operate backwards. I may know someone who did this recently, but he probably wouldn’t admit to it… - Source: Internet
- A leaky faucet, if left unrepaired, can become a major problem beyond the money it’s costing you on your water bill. A faucet dripping water can be indicative of a larger problem that could cost you hundreds of dollars. The most common causes for sink faucets leaking include defective parts like o-rings, washers and gaskets. Corrosion and mineral depostis can also lead to sink faucets leaking. - Source: Internet
- We know that we are here to fix a leaking faucet, but while in the washroom with a pair of plumbers grips in hand I couldn’t resist removing and cleaning out the faucet aerator - below you can see why I am glad I did. I’m purposefully not going to mention the appearance of a Band-Aid for these last few images - but I did go back and add ‘first aid kit’ to the essential tools list - nothing if not thorough, that’s me! (And that’s all I have to say about that…) - Source: Internet
- Prior to disassembling the leaky faucet, deactivate the water beneath the sink to avoid water damage to the vanity and floors. Next, place a paper towel or cloth over the drain to ensure you do not accidentally drop parts down the drain pipe. To fix a damaged faucet, you will need to grab a wrench to dismantle the bathroom or kitchen sink. To avoid scratching the finish on your sink, apply duct tape to the wrench prior to applying it to the fixture. - Source: Internet
- A leaky faucet is not only annoying, but it also causes your water bills to rise. Imagine the agony you will go through when it is not fixed on time. At some point, you will lose sleep over the sound of incessant dripping. As if that is not enough, your kids may take advantage of the situation to make a mess thanks to the dripping water. - Source: Internet
- Helpful tip: When unscrewing these screws, put the drain plug in (unlike me) so that if (or when) you drop the screw, it doesn’t fall into the sink trap. (And yes, I’m talking from experience here… sink P-traps are just plain nasty, there’s no quicker way to ruin a nice leaky faucet fix than losing one of the screws you can’t live without down the drain - trust me). - Source: Internet
- The first thought that comes into your mind when you have a leaking bathroom faucet is to call a plumber to fix the problem. However, you may not have the money to pay for the services. Also, they may take too long to help you with your problem, especially if it happens at night. The good news is, you can fix a leaky faucet for bathroom and sink on your own if you follow these steps. But first, gather all the right tools and supplies for your project. - Source: Internet
- Once the cartridge is removed from the leaky faucet, pull the spout off the fixture and remove the corroded O-rings. Next, insert a new pair of O-rings into the sink and apply a heat resistant solvent to them. If you are planning to replace the cartridge, you will be required to measure the old cartridge. Purchase a brand new cartridge assembly with the same dimensions to ensure it fits properly in your fixture. - Source: Internet
- Once the cartridge is carefully unscrewed, lift the faucet cartridge up and away and take a look at the seat face that the sealing washer tightens down onto. The face needs to be clean and free of major pitting - many are chrome-plated on a brass faucet body, and over the years they can get worn and corroded. Thankfully, mine looked good enough for a few more years of service. - Source: Internet
- Once you have removed the handle, you will see the inner valve system. Separate this part from the body of the faucet. The style of the faucet and shape of the parts will determine the method for extraction. Some have a brass valve stem that detaches it from the valve body while others use a plastic or brass cartridge. Whatever the case, always refer to the instructions manual for guidance. - Source: Internet
- The first step to fixing a leaky cartridge faucet is to remove the handle. First, pull the lid on the handle to reveal a set of screws, Next, disassemble the screws and bend the faucet handle backwards to remove it. You should see a threaded clip that is securing the cartridge to the faucet. You will need to use a pair of pliers to remove the clip prior to disconnecting the cartridge from the leaky faucet. - Source: Internet
Here are a few tips to help you find information about Faucet Dripping After Water Turned Off:
- Look for good places to get information about How To Fix A Leaky Kitchen Faucet Handle. This can be done in libraries, on websites, or even by paid journalists.
- When looking for information about How To Fix Leaky Faucet Handle, it’s important to know that there are different kinds of online sources, like Google and YouTube. Social media sites like Facebook and Twitter are also good places to look for information about Bathroom Sink Tap Leaking Underneath.
Video | How To Fix A Leaking Faucet In The Sink
To get the best information about How To Fix Leaky Faucet Handle, you should read to find out how true each source is.
This article has a few videos from different places about how to fix a leaky faucet under the sink that will help you learn more about it. The Internet is a great place to find out about a wide range of things.
## Here are some crucial aspects concerning Bathroom Faucet Leaking From Underneath:- How To Fix A Leaking Faucet In The Sink
- How To Fix A Sink Faucet Leak
- How To Fix A Leaking Faucet In The Bathroom Sink
- How To Fix A Leaking Faucet Under The Sink
- How To Fix A Leaky Faucet Under The Sink
With so many websites and forums that talk about Bathroom Faucet Leaking Under Sink, it shouldn’t be hard to find what you need.
Most people are used to getting information about How to Fix a Leaky Faucet in a very different way than this. It lets you look at the information about Kitchen Faucet Leaking From Neck and how it can be used in more detail.
 ways to put information about Faucet Leaking Under Sink When Turned On in a way that looks good and is useful. They can be used in business and marketing, and they can also be used to talk about how to fix a leaky bathroom faucet under the sink. So, we also give you some pictures about how to fix a leaky faucet sink.
In the end, this article gives a summary of How To Fix A Leaky Bathroom Sink Faucet Single Handle. Also talked about are How To Fix Kitchen Faucet Leaking Under Sink and How To Fix A Bathroom Faucet Handle, which you can use to compare how much you know about How to Fix (or Replace) a Leaky Faucet Yourself.
