Today’s topic is Easy Drawings To Draw On Your Hand. Obviously, you can find a great deal of Aesthetic Things To Draw On Your Hand-related content online. The proliferation of online platforms has streamlined our access to information.
There is a connection between the Hand Drawing Ideas and Simple Drawings information. more searching has to be done for Hand Drawing Holding Something, which will also be related to easy drawings you can draw on your hand.

81 Facts Easy Drawings To Draw On Your Hand | Things To Draw On Yourself Easy
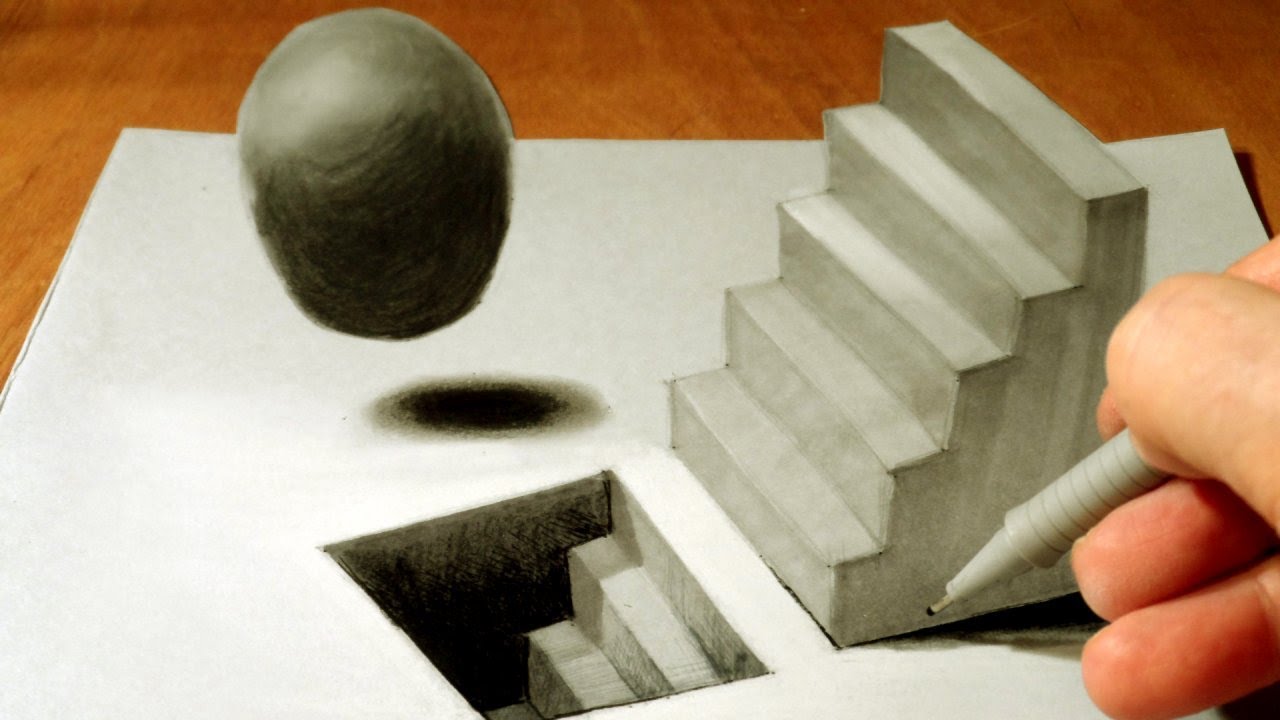
- Pencil ****drawings are just the tip of the iceberg. Try charcoal, pastels, pens, markers, crayons, and conte crayons. Experiment and mix media to discover what produces your best ****drawings. - Source: Internet
- Notice the relative absence of curved planes. In simplified constructions as contrasted with finished ****drawings nearly all the surfaces meet at a definite angle. This is to remind ourselves that everything, no matter what, has front, back, sides, top, and bottom. - Source: Internet
- A “handy” guide to drawing hands — Drawing human anatomy is tricky, and the hands might be the most challenging body part of all. In this guide, we break down the internal structure of the hand and how you can articulate the bones and muscles under the skin. Follow these steps to bring your drawing to life. - Source: Internet
- Your own caricature: This one is quite different from drawing yourself as a cartoon. Therefore, you will need a mirror. - Source: Internet
- Drawing is known to stimulate blood flow to the front of your brain, allowing you to relax, forget your problems, and enjoy low blood pressure that is normally associated with peace and happiness. A recent study revealed that 75 percent of the people who draw regularly are more relaxed and happy than those who don’t. What’s more, a significant portion of this percentage consists of people who just draw for fun. - Source: Internet
- Start by drawing a simple shape of your lower palm. This is the area where your thumb forms a valley with your index finger. It will resembled a slanted pentagon, like the image below. - Source: Internet
- The third option is to draw the gesture of each finger. Don’t worry about separating each phalanx. Ignore the joints and just identify the motion of each finger. Do this very lightly. - Source: Internet
- I’ll admit I used to draw people with their hands tucked away in their pockets or hidden behind their backs. I would always find ways to hide them because drawing hands was one of my biggest weaknesses. Don’t let it be yours! Tuck your fears away, take your pencils out and let’s practice drawing some hands together! - Source: Internet
- You don’t have to go far to find inspiration for what to draw. Just look around your house for what to sketch. Every object is an opportunity for drawing. If you’re feeling ambitious, try combining them into a still life. - Source: Internet
- Below is my D.I.Y ( Do It Yourself ) step by step guide for you to wash your hands after you’ve done with any activities including digitally drawing with Clip Studio Paint and put down your graphic tablet. You might ask… - Source: Internet
- Although the best way to improve your drawing is to just get started, figuring out what to sketch can be challenging. Like all creative endeavors, everyone goes through “blocks” where they can’t figure out what to put pencil to paper. Well, have no fear! We’ve got a list of 100+ easy drawing ideas for you to try and fill up your sketchbook with. They range from everyday objects to fantastical cityscapes—we recommend trying a variety in order to flex every bit of your drawing muscle. - Source: Internet
- ( A ) Always be sure to observe the precise shape of the nails and their relationship to the form of the finger tips. I ask my mom to pose. Watch how radically such relationship alter when viewed from different positions, especially drawn from the top. - Source: Internet
- If you follow and complete this big drawing ideas list or easy, cool, fun things to draw when bored, you would end up with a pretty good portfolio and would have honed your drawing skills a lot. The purpose of this blog was to brush up on the basics, draw your hand at new things and draw some unusual thing that you would not have drawn in normal circumstances. Our purpose was to introduce you to a new world of art that is unique and unlike anything that you have ever experienced in an art class. - Source: Internet
- Finger-spelling is also used more in JSL than it is in ASL. Finger writing (drawing Japanese characters in the air) is sometimes used in JSL. Finger writing is never used in ASL. - Source: Internet
- I have always found that by taking a complex task and narrowing it down into separate segments, I’m able to draw even the most complicated things, including hands. If you’ve struggled with hands that end up looking like claws, like I did, this tutorial should assist you with creating more real-looking ones. In this guide, I use the Arteza Professional Drawing Set. With this set, I achieve a wide range of lead hardness, which means I can go from the lightest pencil marks to the darkest with ease. I really recommend investing in true artist-grade pencils, because they can make a large range of values, which is important for a realistic result. - Source: Internet
- The easiest way to learn how to draw hands is to first understand its proportions and bone structure. This tutorial will cover how to construct a hand and help you understand it’s proportions but the bone structure is abstract. If you want to see a skeletal diagram of a hand, please click here. I will soon be making a part 2 covering nails, skin and wrinkles. You can follow me on Facebook to get an update whenever I post a new tutorial! - Source: Internet
- They say practice, practice makes perfect. So, if you want to improve your drawing skills, you have to practice regularly. Drawing regularly will also help you to build a steady hand, making it easier for you to draw with better control. - Source: Internet
- When you’re figured things out with realistic approach; you’ll naturally draw any fingers, hands, and other usual anatomy ****drawings (especially body and gestures) without worry about the weird proportions. You can draw within any style that you’d like. - Source: Internet
- Practice is a vital part of perfecting your drawing skills. Learning the basics and repeating them over and over again is the only way to improve. For proof, just check out what a few years of drawing practice can do. It’s truly incredible the progress that you can make by dedicating time to this pursuit. Those who do have gone from scrawling simple figure sketches to fully-rendered portraits in seemingly no time. - Source: Internet
- Drawing is a form of communication that doesn’t use spoken words or texts. Therefore, learning how to draw will enable you to develop new ways of communicating. For instance, you will grow to deeply understand different facial expressions, gestures, and the overall emotional effect of different colors and shapes. - Source: Internet
- Know your nose with this tutorial — Of all the facial features, the nose is one you might not give a lot of thought to. But don’t ignore it—this feature helps define the face. We’ll go over the anatomy of the nose and how you can draw it in a realistic way. - Source: Internet
- Use an HB pencil to draw a rectangle slightly longer than a square. Make a slope at the top. The right side of the curve will dip down much lower than the left side since we are drawing the back of the right hand. Taper the right side of the rectangle as well. - Source: Internet
- Learn to draw lines out from the circles as fingers, ensuring the proportion is right, with more circles on each finger to give them shape. You can now draw an outline of the hand around this shape. Once you’ve mastered this, try drawing other gestures. - Source: Internet
- You don’t have to draw dragons to exercise your imagination. If you like design, try creating your own patterns or filling a sheet of paper with stylized flowers. These ideas will get you started. - Source: Internet
- [ My tutorial focused on explaining in depth for each hands, I will not talking about you have to do it my way, tell you how to color, using this particular brushes, etc. But more to theoretically present the principle of hands drawing from my passed away master of traditional sketches, my only mentor in hyper realistic drawing: my uncle, Mr. Hariyanto. “I miss you, sensei.” ] - Source: Internet
- While there are seemingly endless cool drawing ideas floating around, some of the most popular subjects tend to be nature-themed or revolve around the human figure. Get acquainted with how to draw them with some of the step-by-step guides below. You never know—learning to draw them might spark even more drawing ideas! - Source: Internet
- In our previous tutorials, we showed you how to draw a face and how to draw a person. In this one, we’re going to teach you how to draw hands in five steps. Even if you’re an absolute beginner, you’ll still be able to follow along. - Source: Internet
- Outlines and shadows can be added to finish the drawing of the hand. Remember to consider the light source when you are adding the shading. It should be consistent for all of the parts of the hand and each of the fingers. - Source: Internet
- Learn how to draw a rose — The rose is an enduring symbol of love. Just as writers have spoken of its beauty, artists draw its delicate petals. But just because the rose is popular doesn’t mean it’s easy to sketch. Loaded with layers of petals, it can be a challenge. But have no fear—we break a rose drawing down so that it’s both approachable and fun. - Source: Internet
- Of all parts of the body, the hand is by many considered to be the hardest to draw. We all have stories of how, early on, we would keep our characters’ hands behind their backs or in their pockets, avoiding as much as possible the task of tackling hands. Yet paradoxically, they are our most readily available reference, being in our field of vision every moment of our lives. With just one extra accessory, a small mirror, we can reference hands from all angles. The only real challenge, then, is the complexity of this remarkably articulated organ: it’s almost like drawing a small figure onto a larger one, one doesn’t know where to start. - Source: Internet
- The limitations are very great indeed, either with or without mirror, but perhaps greatest without one since it is almost always obvious that the hand drawn is the artist’s own, and we are always necessarily confronted with the thumb side, as in the drawing directly above. Image below is my mom’s fingers reference and I did not the exact way, adding more imagination and slightly make it… A bit less wrinkles and give a long sleeve in order to make it into an old style drawing. - Source: Internet
- Drawing has become an interesting hobby for many people. Fortunately, you don’t have to be a professional artist to make it your pastime too. Once you start drawing, you will enjoy several amazing personal benefits. Here are some of the benefits of learning how to draw. - Source: Internet
- Drawing from imagination is good paired with drawing from life. If you’re drawing from imagination and you’re really struggling with a certain pose, take a picture of your own hand in that pose and study it. When you study from life you learn more about how the hand works and how the shapes look in various poses. You can use that knowledge to improve your work from imagination. - Source: Internet
- Step 8 I draw the pointing finger along its dotted line. Half of the middle and the tip are visible. I join the “mitten’s” lower portion, representing the back of the hand, from the little finger to the thumb. - Source: Internet
- The muscles on the pinky side are also a teardrop, but they’re mostly covered with a thick layer of fat on the palm. I include the fat and draw the form as a convex box. When the pinky is flexing or abducting, the crease between the fat and muscle appears. I’ll show the corner of the fat pad, and the round form of the muscle belly. If the the pinky was relaxed, I would round out this edge. - Source: Internet
- A hammer: A hammer is one of the tools that make great subjects for ****drawings. It is quite easy to draw. - Source: Internet
- Now that you’ve learned how to easily draw a hand, you can start giving your characters and people even more personality. For more inspiration, search the internet or flip through fashion magazines for hands you can use for a reference. With plenty of practice, you’ll be able to draw hands without even thinking twice! Let me hear from you and how you’re doing with this tutorial. - Source: Internet
- Focus onto shading first, add values to your drawing with black and white or any other monotone. Don’t start with colors yet, but aim to had the understanding of shapes, forms and full control of your pen pressure. - Source: Internet
- Whether you are a professional artist or just drawing for fun, you need to continuously look for drawing ideas that will keep you busy and inspire your next project. Like any other form of art, drawing requires relentless practice. That’s why you need to always have your sketchbook handy. This article offers you the 43 cool and easy things to draw in your sketchbook. - Source: Internet
- If you’re itching to sketch all the things, check out the top drawing tutorials on YouTube. These artists will help you learn to draw for free. And if you’re looking to empower your creative journey even further, check out our illustration courses on My Modern Met Academy. - Source: Internet
- Draw from references if you don’t have a mirror, ask your parents, your fiances, your friends. Make sure to draw from reality. Many of hand drawing tutorials here already filled with anime style ****drawings, which is good. But not really the best way to develop your skill. - Source: Internet
- If the fingers are grouped together, you can try to imagine a mitten shape for all of them. If one or more of the fingers is separate from the group, draw it separate. Group the ones that you can and decide if they’re bending. - Source: Internet
- So lets do it. Your assignment is to follow this process and draw 5 hands from imagination. Post them in the Anatomy Group. I might critique your drawing in the next critique video. - Source: Internet
- How to draw a hand? You can tell a lot about a person by the way they use their hands when they’re talking or contemplating something. That’s why I believe the quickest way to give my portraits or character illustrations personality and emotions is by using interesting hand poses and gestures. And, even though there are so many components of hands, I’m here to demonstrate an easy process of making natural-looking hands. - Source: Internet
- Hands are one of the most expressive parts of a pose. By conveying the story and emotion through the hands, you can add more life to your ****drawings. In this tutorial, artist Stan Prokopenko covers essential forms of the hand so that you can learn to create realistic hands from your imagination. - Source: Internet
- Tumblr and Instagram among other platforms offer daily drawing challenges (think Inktober, but yearlong). Joining one of these and posting your ****drawings will increase your accountability and motivation. Not only will set themes give you direction and just the right amount of constraints to work within, you’ll also be joining a creative community that shares feedback. - Source: Internet
- Kids’ toys: Most toys come with simple but interesting shapes that you can draw. Furthermore, most of them are brightly colored. - Source: Internet
- Our hands are extremely expressive and can form endless amounts of gestures. These gestures can convey many emotions such as fear, anger, sadness and happiness. No wonder they’re so difficult to draw! - Source: Internet
- Does your artwork depict intricate details? Try using a drawing pen. Pens offer consistent linework and precision. There is a pen for almost every type of linework, including sketching, cartooning, drafting, calligraphy, and more. Check out our picks for the best drawing pens. And if you’re looking to add color to your work, we’ve identified some of the best colored pencils to use, too. - Source: Internet
- The first step is to get a clear idea of the hand you’re gonna draw. Don’t jump in blindly and start drawing. Figure out the angle we’re looking at the hand from. Can we see the back of the hand or the palm? How much of the front are we seeing? Or are we looking at it from the back? What is each finger and thumb doing? What about the wrist? - Source: Internet
- Now that we have all 4 fingers drawn, it’s time to locate each joint. Add 2 more ticks on the middle finger, each roughly 1 quarter of the way down. Using these ticks, draw 2 more curves. We now have reference points for joint placement! Wasn’t so bad, was it? Please note that these are only loose measurements for simplicity sake. - Source: Internet
- Step 6 Here, the ring finger peeks out from behind my pinky. I study the arc’s distance, as this will determine the finger’s length, and I draw it to where I want it to meet that line. Notice that the lower joint is concealed behind the little finger. - Source: Internet
- It is safe to say that everyone loves kittens and a kitten which is seen in most cartoons is beyond cute. You can practice by drawing a real kitten and then move onto the cartoon one. If you find it difficult to draw you can divide it into parts; the head first then the body and after that draw the limbs and end with the tail. - Source: Internet
- However, limited the basic view of it may be, each pose, even though similar to a preceding one, is always subtly different. So, there is more of an exercise in drawing and less of an anatomical study. Exploration of forms is common to most master ****drawings in any era. - Source: Internet
- An old person’s face: You can either draw the face of your grandparent or find a picture of an older person that you know. Make sure you get the wrinkles right. - Source: Internet
- 360 degrees: Choose an object and draw its outline. Turn the object slightly and draw the outline again. Repeat. - Source: Internet
- It is perhaps the coolest thing to draw because who does not love Captain America. The shield of Captain America is a sign of bravery and loyalty and it is the best shield as nothing can damage it and it has saved Captain’s life countless times. You can draw it by making a circle which blue and red lines and white stars. - Source: Internet
- Lips might seem easy to draw but they would prove to be difficult if you do not pay attention. If you focus, you would find lips to be one of the easiest parts of the human body to draw as it involves curves only. In a mirror, you can observe your own lips and try to replicate them on a paper by imitating the curves and edges of your own lips. - Source: Internet
- Keep in mind, even though the process itself is quite simple, drawing hands is never going to be easy. There’s prerequisites that make it challenging, like anatomy, perspective and shading. If you want to draw simple hands, rather than learn a simple process to draw real hands, I also have a lesson on drawing Cartoon Hands. But all this stuff ties together, so let’s get started… - Source: Internet
- Next, draw a transverse line to mark the place where the metacarpals end and the proximal phalanges begin. The former area is where the so-called “mountains of Mercury, Sun, Saturn, and Jupiter” are, while the latter refers to the area of “the mountains of primary and secondary Mars and plain of Mars.” - Source: Internet
- To determine the length of each finger, measure the length from the wrist to the knuckles and duplicate that. The dotted line marks the maximum finger height. Our fingers vary in length and since the middle finger is the longest, we will use it as a reference to find the height of the other 3 fingers. To do that, draw a curved line that is similar to the first one drawn in step 1. - Source: Internet
- Hands are extremely expressive. When you’re drawing hands you have to be an actor. Just like when you’re drawing facial expressions. You gotta feel the expression of the hand pose you’re drawing. - Source: Internet
- To draw a hand in a fist, start from the proximal phalange of the thumb first and connect it to the Thenar and the Hypothenar Eminence, i.e., “the mount of Venus” and “the mount of moon,” like Gonçalo shows: - Source: Internet
- For the thumb, draw a curved line coming from the bottom left circle. The height of the thumb will change depending on how far it is spread out. Measure the length of the thumb and draw a circle at the halfway point. Add another circle halfway up from there. - Source: Internet
- Gonçalo starts off by drawing the thumb part between the metacarpophalangeal and interphalangeal joint cases. Don’t let these big words scare you. The former refers to the joint that connects the thumb to the palm and the latter to the joint where the thumb bends. - Source: Internet
- The cover photo is the actual me in person (Futopia; on the right) with my mom. Well, we use the A4 paper in order to let Clip Studio team and judges know exactly that it’s actually us, the real persons behind this tutorial creation. I use my mom’s hands and mine as references for ****drawings as well as my fiance’s hands for female part but I don’t want to distract viewer’s attention with so many photos: in the end, we keep everything simple by using only sketches and our avatars. - Source: Internet
- Practice, practice, practice. The way to get good at drawing hands is to draw lots of them. Before you get into drawing realistic, academic hand ****drawings, start with stylized ones that you can find in illustrations. - Source: Internet
- Hands are the ideal subject for beginners, with different gestures providing perfect practice for perspective, scale, curves and lines. Use with either a photo or a wooden artist’s model of a hand that can be moved into different positions. Beginners should try drawing the basic outline of an open hand, starting with the palm. - Source: Internet
- In the past, many people believed that drawing was an artistic undertaking pursued by a few people with the dream of achieving artistic greatness. However, today people have realized that drawing is much more than that. That’s why you will find a lot of people, both young and old, carrying their sketchbooks around. - Source: Internet
- If you are drawing multiple subjects or one subject with multiple parts, always make sure the size and position of each subject are proportional to the others. For instance, if you are drawing a person’s face, place their eyes directly in the middle of the head. Checking the proportions of each subject helps to ensure that no subject is too small or too big in relation to another. - Source: Internet
- Investing in great supplies will help ensure that you expand your sketching capabilities. So, check out our recommendations for the best drawing pencils, best sketchbooks, and best type of paper. Although pencils are the most popular tools when it comes to drawing, charcoal is also fairly popular for those who like to sketch and do it fast. While working on ****drawings that have deep shadows, charcoal will offer rich black tones perfect for shading. You can check out our selection of the best charcoal pencil sets for artists. - Source: Internet
- Use this diagram form before beginning any drawing, but keep it separate and do not attempt to superimpose the finished drawing over it. Above was taken from my past tutorial as well. Focused on creating heads for galactic creatures. If you’re interested, please head to the link I provided. - Source: Internet
- Always make sure your drawing fits well into the drawing area. For instance, if you are drawing on a piece of paper, size the subject to ensure that it fits in the sheet. But it should also leave enough space on the sides so that it doesn’t look cramped. At the same time, make sure the subject doesn’t appear too tiny on the sheet. - Source: Internet
- Feel free to download and use the hand images below for your reference! You may find that it is difficult to use the measurement system for certain gestures. In this case, eye the approximate measurements and remember to implement the use of curved lines when drawing fingers. If you practice enough, you should be able to sketch them without the use of guidelines or better yet, be able to visualize and draw any gesture! Understanding muscles, tendons and fat tissue will help add a layer of realism to your hands. Click here for an interactive 360 degree model. You can view different layers by clicking on the thumbnails at the top. - Source: Internet
- Game pieces: If you love board games, just pull one out and take a look at the pieces. Choose the pieces that will make an interesting subject for drawing. - Source: Internet
- Subtractive drawing: Try this one with charcoal. Using it horizontally, shade your paper an even value of grey. Now “draw” with your eraser – erase the highlights of your subject. - Source: Internet
- As you start your drawing project, start with the larger shapes and work your way down to the smallest details. For instance, if you are drawing someone’s face, start with the shape of the head and the neck. Then, work your way down to the smallest details such as eyes, mouth, nose, eyelashes, nostrils, pupils, etc. - Source: Internet
- This means that you shouldn’t fully draw one part of a subject first before moving to the next one. For example, if you are drawing a person’s face, don’t fully stretch one eye and then proceed to draw the next. Instead, draw the outer shapes of both eyes and then move on to the pupils. - Source: Internet
- A stapler: Staplers are everywhere and they’re made up of simple shapes that are easy to draw. Start by drawing the shapes and then add the details. - Source: Internet
- When drawing, minimize the number of strokes and use long steady lines. Don’t scribble or make many small strokes to draw a line. If you make a mistake when drawing a light line sketch, you can draw several lines to correct it. But if the mistakes are too many, you should just erase them and start afresh. - Source: Internet
- Nature has long provided artists with inspiration for drawing. Trees and the sandy beach are both beautiful to look at and are also fun to draw. As you improve on your drawing, try revisiting these same subjects to see how differently they now look. - Source: Internet
 Following are some suggestions on where to begin your search for data on :
You should try to find Hand Drawing Ideas-related information from reputable places. Libraries, online resources, and even paid journalists all fall under this category.
Following are some suggestions on where to begin your search for data on :
You should try to find Hand Drawing Ideas-related information from reputable places. Libraries, online resources, and even paid journalists all fall under this category.It’s crucial to be aware of the many electronic media sources available when researching Cool Doodles To Draw On Your Hand, such as Google and YouTube. You may also get info about How to Draw a Hand Easy and Quick on social media sites like Facebook and Twitter.
Video | Easy Drawings To Draw On Your Hand
It’s crucial to read to examine the authenticity of each source in order to acquire the greatest information regarding Small Things To Draw On Your Hand. You’ll learn more about Something To Draw after watching the films included in this post, which come from a variety of different sources. Information on a wide range of topics may be easily accessed via the internet.
## Notable features of cool simple things to draw on your hand include:- Easy Drawings To Draw On Your Hand
- Simple Things To Draw On Your Hand
- Easy Pictures To Draw On Your Hand
- Small Easy Things To Draw On Your Hand
- Easy Sad Things To Draw On Your Hand
Because there are so many websites and forums that provide information about Hand Drawing Ideas, it should not be difficult for you to locate the data that you want.
The majority of individuals are accustomed to taking a completely different approach when it comes to obtaining information regarding 60 + Easy Drawing Ideas For Your Sketchbook. This makes it possible to take a more in-depth look at the information that is available about Draw Expressive Hand Poses from Imagination! and how it might be utilized.

methods for producing information displays about Simple Drawings that are both aesthetically pleasing and functional. In commercial and marketing settings, as well as for the purpose of conveying information on Something To Draw, they are useful tools to have. Because of this, we also supply some photographs relating to Hand Drawing Easy.
In summing up, I’d like to say that this article offers a general summary of Things To Draw On Yourself Easy. Also covered are Things To Draw On Your Arm Easy and Simple Drawings, which serve as a benchmark for evaluating the depth of your understanding of Things To Draw On Hand.
