This time around, we shall cover How To Replace Shower Head And Faucet. Obviously, there is a great deal of information on How to Fix a Leaky Shower (Step-by-Step Guide) on the Internet. The fast rise of social media facilitates our ability to acquire knowledge.
How To Replace Shower Faucet Handle-related material is also connected to how much does it cost to replace shower head and faucet and how to replace delta shower head faucet. As for further searchable items pertaining to How To Install Shower Plumbing, they will likewise have anything to do with How to Install a Shower and Tub Faucet.
79 Tips to How To Replace Shower Head And Faucet | DIY: Install a Shower Head & Hand Shower
- Clean off any existing thread seal tape or sealing compound from the threads. Wrap new thread seal tape around the threads of the shower arm and install the new shower head by screwing it on clockwise until it’s tight. In just a few simple steps, you’ve installed a new shower head with just a few simple tools. If you would also like to install a hand shower, instructions are below. - Source: Internet
- Local plumbers are experienced in repairing and replacing shower faucets. They have access to the tools necessary for this plumbing job. Furthermore, they often stock a wide range of faucets, so you can choose a similar model or a new one to give your shower or tub a new look. - Source: Internet
- H2OKinetic Showerhead Shower Systems Many Delta showerheads feature their patented H2Okinetic technology. When shopping for Delta shower systems with handheld shower, look for the mention of “H2Okinetic”. Many showerheads, and even some hand showers, have this special H2Okinetic design. As illustrated below, H2Okinetic shower heads are designed to give you the feeling of more water, without actually using more water. As you are browsing and determining your preferred Delta shower heads and handheld spray, if you see the term H2Okinetic you can reference back to this image and you’ll understand what it means! Especially when building a custom shower system, where water flow rate is always a concern, H2Okinectic showerheads are a great option to consider. - Source: Internet
- Installing a Shower System with Showerhead and Hand Shower Sprayer Whether you are building a new home or remodeling an existing bathroom, a Delta Shower System with Hand Shower will help you create the shower of your dreams! Why choose a normal Delta shower faucet with a single showerhead when you can make your shower experience more enjoyable and add tons of functionality with the addition of a handheld sprayer? If you haven’t already, Take a look at our more general guide to Delta Shower Systems. In the general article you will get an overview of how a shower system works, how to build a shower system, and you will learn about the many different types and configuration options available. You can also check out our 1000s of pre-built complete custom shower systems. This particular article will explain different components and features to consider specifically when planning a Delta shower system with handheld spray and showerhead. It will also explain how to install a Delta shower system with hand spray. - Source: Internet
- By letting you direct water where you want it, adding a hand shower is an easy way to add style and functionality to your bathroom. Installing a new shower head and hand shower will be an easy project for even unexperienced do-it-yourselfers. For further help, a video is available. If you have trouble, connect with us online or call the Delta Help Line at 1-800-345-DELTA (3358). - Source: Internet
- *Note, in the video at around the 13:55 mark, the installer starts talking about the 3-port diverter valve and how you can add on another showerhead or a ceiling mount showerhead if you want. It’s true the Delta diverter valve would enable this, but if you want an additional spray outlet, you will need to switch to a Delta 6-setting diverter trim. Learn more in our Shower System Buying Guide. In this particular article, we only focus on 3-setting, 2 spray outlet shower systems where the 3rd diverter port is capped. Keep reading to learn more. - Source: Internet
- Depending on the condition of your old shower head you may need a wrench to help unmount your old shower head. Overtime, shower head connectors can corrode which calls for a little extra elbow grease. However, Clear Shower XL’s ball joints are made from stainless steel so you’ll never have a problem taking your new Clear Shower XL shower head on and off. - Source: Internet
- To install a wall-mounted hand shower, select a spot to install the hand shower, taking the height of who will be using it into consideration. Remove the bracket cover from the wall mount and mark the location for the screw holes. Drill ¼” holes into the tile and insert an anchor, gently tapping it with a rubber mallet until it’s flush with the surface. Attach the wall bracket with screws, and slide the bracket cover over it. - Source: Internet
- Installing a delta shower faucet with hand held is probably a task best left for a professional, but you can learn a lot about the job requirements if you keep reading. Choosing the perfect shower system can help make your dream bathroom a reality! Our helpful infographics (below) illustrate how everything in your shower system will connect inside the wall. We will also outline the placement of the fixtures for optimal results. This article even has a video that will help you explain the basic set-up required for a handheld shower with showerhead complete shower system. Make sure to scroll down and check it out! - Source: Internet
- Water Temperature: If the temperature of the water isn’t getting hot enough, the problem may exist within the shower faucet’s mixer valve. This valve mixes the hot and cold water to deliver your chosen water temperature. To determine whether the problem is your mixer valve or not, try testing the temperature of the water in your bathroom or kitchen sink. If the water temperature is what you had in mind when it comes out of other faucets, it is more than likely an issue with your shower system’s mixer valve. Our tip: take the temperature of the water from all the faucets in your home when they are turned to the hottest setting, and keep a record to track for consistency – you may have a problem with your water heater if the temperatures fluctuate often. - Source: Internet
- Leaks: A shower faucet system can develop a leak in a number of places. First, you’ll need to determine where the leak is coming from. The most common places for leaks to spring up are where the showerhead connects to the shower arm (the pipe that comes out of the wall that you connect the showerhead to), the fixture itself (the components can develop cracks or become loose with wear), and where the shower faucet is connected to the pipes behind the wall. Check those first. - Source: Internet
- Now, it is time to drill holes for the shower handle and showerhead. Check the measurements carefully because you need to be highly precise. After that, mark the exact points and drill holes with a drill saw. - Source: Internet
- Next, install the sleeve or cover over the handle valve following the manufacturer’s instructions. Put any trim pieces, like the escutcheon piece, and secure in place. Now attach the handle and secure it in place by tightening the set screw. If there are faucet covers, install those over the opening. - Source: Internet
- Most plumbers can fix a wide range of problems that come up with bathtubs and showers, including slow or clogged drains, leaky fixtures, insufficient water pressure and more. A non-working shower can be a major nuisance, so you’re most likely looking to get it fixed ASAP. Let’s explore what types of things can affect the cost of your repair, how to hire a shower repairman (and save money while doing it), and the benefits of hiring a professional to complete the repair. Ready? Let’s dive in. - Source: Internet
- I will be entirely honest with you. To finish this kind of job, you will need some basic knowledge of plumbing and woodwork and a lot of patience. Take your time, read the faucet manual thoroughly, and take care not to lose any part of the head shower set. - Source: Internet
- Showers typically have one valve for both hot and cold water with a valve handle. The valve controls water pressure and the temperature of your shower. A leaking shower valve needs replacing to avoid any hidden water damage and leaks within the wall itself. Unlike a shower hose leak, shower valve leaks can be harder to spot. Turning the water on and following any signs of water damage should pinpoint the problem and determine the need to replace your shower valve. - Source: Internet
- Unpleasant Odor: If you notice an unpleasant smell emanating from the shower area, it could be a result of mold or mildew originating from a leak somewhere in the shower faucet system. Our tip: check whether the smell is actually coming from the drain or not before calling in mold removal services or knocking down any walls. This is a problem that may be easily addressed with a few treatments of a chemical drain cleaning solvent. - Source: Internet
- In case you decide to install a rain shower head, you should read the instructions and suggestions for the installation of this kind of faucet. You will probably need to place it higher than the standard showerhead. The goal is to get that special feeling of rain falling on you. - Source: Internet
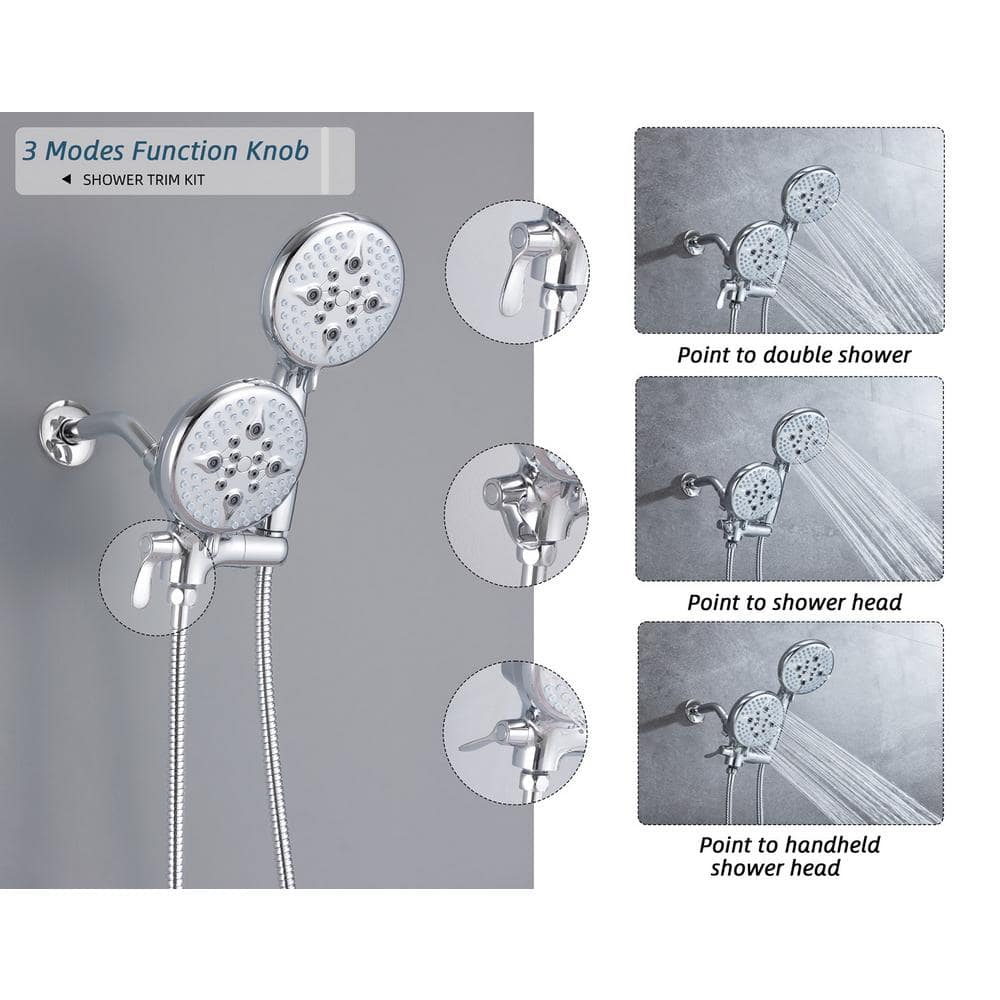
- 3-Setting Shower Diverters Shower systems with a hand shower and showerhead utilize a 3-setting diverter trim kit. The diagram below illustrates the 3 diverter trim kit handle positions and shows how the water flows through the diverter valve based on each setting. In a shower system with a separate showerhead and hand shower, Outlet 1 is assigned to the showerhead and Outlet 2 is assigned the hand shower. The 3 diverter settings allow you to turn on the showerhead only (1st position), the hand shower only (3rd position), or run both together at the same time (2nd position). - Source: Internet
- Remove Excess Dirt Once you remove the old showerhead, you may find gunk around the threaded end of the extension pipe coming through the wall. Use a wire brush, old toothbrush, or damp paper towel to wipe the threads clean. Dry the threads before applying the thread tape. The Spruce / Kevin Norris - Source: Internet
- More Options to Consider Delta Shower Head with Separate Hand Held Sprayer Systems are our most popular configuration, however they are definitely not one size fits all. There are the obvious decisions you’ll need to make before ordering, such as what finish do you like best, and do you want a modern or traditional style Delta shower faucet with separate hand held shower? There are also some less obvious things to be aware of when selecting the perfect Delta shower faucet with handheld spray. While the overall function will be the same, incorporating some of these options lets you customize your shower system exactly how you want! - Source: Internet
- Other Considerations: Water Heater and Water Pressure The hot water supply and water pressure are critical in determining whether the system you’ve designed will be a success. Your water pressure should be at least 45 psi, plus you’ll need to determine if you have 1/2" or 3/4" supply lines at your shower. Delta Custom Showers do not require 3/4" supply lines. For help in determining the demand on your system, we recommend consulting a licensed plumbing contractor and/or the water heater manufacturer to determine if the size and model of your water heater is appropriate. If your water pressure is too low, a pressure booster may be required. - Source: Internet
- Examples of Shower Systems with Separate Hand Sprayer and Showerhead All the planning and hard work will definitely be worth it once you get to the end result: Your very own BEAUTIFUL new Shower System with Hand Spray and Showerhead. Your daily shower routine will never be the same again! Get energized and take control of your day by spending each morning is your dream bathroom. Your shower will sure to be the best in the neighborhood! Take a look and get inspired by the wonderful bathroom shower designs below! - Source: Internet
- Be careful not to mix them. Usually, hot water comes from the left and cold water from the right. According to the position of your hot and cold water supplies, you should connect adapters to pipes from the left and right. That will allow hot and cold water mix in the shower valve and then go up to the showerhead. - Source: Internet
- The Elements of a Delta Handheld Shower Head System To create a Delta shower faucet with hand shower system you will need several component fixtures. You can also browse our pre-built Shower Systems with Showerhead and Hand Shower Sprayer to get inspired. You might even find we have the perfect configuration already for sale! The components necessary to create a complete Delta shower system with handheld sprayer are the mixing valve and control, the diverter valve and control, the showerhead, arm, and flange, plus the hand shower and drop elbow. Read on to learn more! - Source: Internet
- Install the Shower Arm, Flange, and Showerhead Wrap plumber’s tape around the treads and screw the shower arm into the 1/2" female elbow you stubbed out earlier. Slide the flange over the arm and thread on the shower head. Slide the flange forward and turn on the water. Look behind the flange into the hole in your wall to make sure there are no leaks - a flashlight may help. If everything looks good, use some silicone caulk to seal the flange to the shower wall. - Source: Internet
- Adjust the Temperature Limit Stop Delta Shower Mixing Valve Trim Kits all contain a rotational limit stop. The rotational limit stop is basically just a plastic piece inside the shower control. This small fixture physically limits you from rotating the handle beyond a certain point to protect you from being scalded by water that is too hot. A pre-set maximum temperature determines how far you can rotate the your shower control handle before being blocked by the temperature limit stop. - Source: Internet
- Please note the install video below demonstrates mounting the female end of the ball joint to the shower head first. Again, it’s also fine to first mount the male end of the ball joint to the shower faucet first if this makes for an easier install for you and your bathroom. Either way, it’s recommended you install each piece of the ball joint individually to ensure a tight fit. - Source: Internet
- If you’ve been thinking about replacing your old shower head with a new model, or maybe even adding a hand shower, you’ll be happy to know it’s a relatively simple process. You don’t need special plumbing skills, and will likely have it accomplished faster than it took you to get through the checkout line! Best of all, this easy and quick process will give your shower a fresh look in addition to the enjoyment you’ll experience from your new shower. Let’s get started. - Source: Internet
- Connecting the Hand Shower Hose Attach the shower hose to the threaded supply outlet on the drop elbow. Proceed with the installation of the handshower, following the manufacturer’s instructions. Typically all you need to do is thread the other end of the shower hose on to the base of the hand shower sprayer and tighten. CAUTION: To avoid damage to the supply elbow, hand sprayer, or hose finish during installation, wrap with a cloth or tape and use only a smooth-jawed wrench. DO NOT OVERTIGHTEN CONNECTIONS. - Source: Internet
- Start by wrapping some Teflon tape clockwise around the threads on the plumbing pipe where the head attaches. Next, screw on the shower head and hand tighten. Use pliers and a rag to continue tightening. - Source: Internet
- Adding a Tub Spout to your Shower System People often ask us if they can add a tub spout to their shower system. The answer is yes! However it is important that you understand the way the tub spout should be plumbed if you want the optimal results. There is a right and a wrong way to do this and a professional plumber will definitely be an asset here. - Source: Internet
- These types of repairs do not come with a one size fits all solution. You could have a Delta, Moen, Kohler or some old obsolete shower valve. Unfortunately, fixing a shower valve faucet is not as easy as fixing a leaking shower head. Every manufacturer has a different way of repairing their valves and come with different parts. So, you’ll need to do your homework on what type of product you have before you move forward with any repairs. - Source: Internet
- Remove the screw to the existing faucet using your screwdriver. If it is the water flow that is causing a problem, the issue is with your faucet cartridge. Remove the faucet cartridge using your needle-nose pliers. Once the cartridge has been removed, allow any blocked water to drain. - Source: Internet
- Review the specific installation instructions that came with your new shower faucet. Some faucets will use the existing faucet cartridge, while others will come with a new cartridge. If yours has a new cartridge, remove and replace the old one. Then, push it firmly into the valve until it is snug, and tighten the nut using a rag and channel locks. - Source: Internet
- To identify the exact location of the leak, turn your shower on. Leaking from the shower hose is usually visible and easy to spot. Once you have identified where the leak is and are ready to fix this, turn off your water supply. Typically, a leaking shower hose is caused by faulty inner seals that have simply worn over time. - Source: Internet
- After turning the water back on, allow the faucet you left open to run for a short time before shutting it off. Next, check for leaks around the shower head and faucet handles. If there are any leaks, tighten the appropriate part. Lastly, turn the faucets on to ensure water flows correctly from the shower head and tub faucet. - Source: Internet
- Therefore, you should leave some water supplies previously, just in case someone needs it. Unless you live in a one-floor home, you should let the water from lower levels of the house run out and release the pressure in the pipes. After securing your lovely home, you can get on installing a shower head faucet. - Source: Internet
- Shower Bench If you plan to install a shower bench, make sure the controls, and especially the hand shower, are installed near enough so they can be operated while seated. This is an important feature to consider adding to your shower. As we age, having a comfortable place to sit in the shower can be the type of thing that allows you to stay in your home long term. Even if you’re young, take a load off! Your shower is for relaxing! So grab a seat, turn on your shower system hand shower, and enjoy a luxurious experience. - Source: Internet
- Shower faucets are removed differently depending on the make, model, and style you currently have installed. Some have removable covers over the faucet handles you can pop off with a small screwdriver. Others can have a set screw underneath the handle you can remove with the correct size Allen wrench. - Source: Internet
- Adding an optional hand shower is another easy installation that will add versatility to your bathroom. A hand shower is especially, well, handy for bathing kids and pets. Hand showers come in several types of mounts: they can be mounted on a sliding wall bar, directly to the shower arm or to the wall itself. Some hand showers are stand-alone, and others are used in addition to a traditional shower head. - Source: Internet
- Running the hot and cold water lines to the mixing valve This step is identical to any shower faucet installation and is not specific to a multi-setting shower system with showerhead and hand shower. You need to run your hot and cold water lines either inside the wall or up through the floor to the shower mixing valve. As shown in the video, it’s probably a good idea to install shut off valves on both the hot and cold water lines while the walls are open as this can be useful later if repairs are ever necessary. This may seem somewhat redundant if you have a mixing valve with stops, however extra ways to shut off the water are cheap to add at this stage and can really come in handy if work ever needs to be done in the future. - Source: Internet
- Turn off the Faucet Do not remove the existing showerhead with the faucet turned on; water will shoot everywhere. Make sure the water faucet is off, but it’s not necessary to turn off the water to the house. The Spruce / Kevin Norris - Source: Internet
- Re-Apply Thread Seal Tape To The Shower Arm Threads - Wrap the shower arm or threads of the hand held shower head holder 4-5 times going clockwise. Use your fingers to apply pressure to the thread seal tape, ensuring that it adheres well to the threads. - Source: Internet
- Water Pressure: Getting weak or inconsistent water pressure in the shower is a very common complaint. While it may not be immediately apparent what is causing the issue, it could simply be a problem with the showerhead. If the showerhead is old, or just hasn’t been cleaned in a while, it may be clogged or blocked by hard mineral build-up. Other potential issues could involve your water pressure regulator or your shower valve cartridge. Our tip: see if unclogging your showerhead resolves the issue before assuming the worst of your pipes, valve cartridge, or water pressure regulator – it could save you from a lot of unnecessary worry. - Source: Internet
- The first step in the process is to accurately diagnose the issue with your shower faucet system. Once you find the source of the problem, you can then assess whether you’ll need to repair or replace it. Here’s some of the most common issues people encounter: - Source: Internet
- Take care to place and fixate the valve to prevent any possible moving. This vertical stud will be the carrier for the valve, and it should be stable. Don’t forget to measure the place for the valve and placed it in the height of the faucet precisely. - Source: Internet
- Once the handle and drain cover of the valve body has been removed, the valve should be open enough to show its interior gasket. The shower valve gasket is what controls and connects the water flow. The valve gasket is the most important element of the valve and is essential to prevent leaks and seal your shower valve body. - Source: Internet
- Again, the new rubber washers can be manually screwed on using your hands. Once fully screwed on, reconnect your shower hose to the base and head. To ensure everything is fully sealed and as watertight as can be, you can use your pliers or spanner to tighten up both ends of the shower hose. - Source: Internet
- Finalizing Plans In the planning stage you to decide what kind of mixing valve you want, what type of diverter, which hand shower, what type of showerhead, and figure out all the connector fixtures like the shower arm and drop elbow. You can also let us help make things easy by simply choosing one of our pre-built Delta shower systems with hand shower. We make sure to include everything your plumber will need for installation! After deciding on all the component fixtures, features, collection, style, and finish of your shower head with separate hand held sprayer system, there are just a few more things you should consider to ensure your system performance will be optimal. - Source: Internet
- Video Explaining the General Installation Set-up After looking at the infographic above, it might help to watch a short section (between 13:15 and 16.01) of the video below. The video gives a great look at a real rough-in job for a Delta Shower System with Showerhead and Hand Sprayer. The video does a great job explaining where to put the valves and where to stub out the pipes for the shower arm and hand shower wall elbow. Seeing a bathroom with all the walls open will give you a great idea as to how a shower system like is installed. - Source: Internet
- The new shower head hits slightly below the top of the window. Previously, the shower head hit about 2/3 up the window. That’s a significant difference, both in function and in form. - Source: Internet
- Clean Inside Of The Shower Head Or Accessory - Whether it’s your shower head, hose or holder that’s been leaking, you’ll want to remove any of the shower head washers from inside the head or accessory. You can pop the shower head washers out using a small flat head screwdriver or a paper clip. Make sure you clean out any debris or loose thread seal tape. - Source: Internet
- Remove The Old Shower Head - While you can generally loosen the shower head with your hands, if it is really stuck on the shower arm, use a pair of pliers or a wrench. Just wrap the threads with a cloth to protect the threads from getting chewed up when using your tools. Remember: lefty loosey, righty tighty! - Source: Internet
- That’s why we reached out to our resident experts to give us the best insight into how to fix a leaking shower head.Before we jump into how to fix your dripping shower head, we need to first cover some of the basics of why a shower head may be dripping.You may not know this, but a leaky shower head is not always due to your shower head being old or defective. To know what you need to do to fix it, you need to look at the two types of symptoms: - Source: Internet
- Once you have removed the cover or handle, you can access the parts and components below. These parts will either pull out or unscrew. Continue to remove parts until you reach the shower valve – the plumbing pipe that sticks slightly out of the wall. - Source: Internet
- As you can see, when it comes to learning how to install a shower head, the main things you need is patience and time. It’s not the easiest process to complete, but it is one that is worth the results in the end. We hope this guide serves you well, and you have beautiful shower results! - Source: Internet
- If the current adapter is not compatible with the new one, you will need to remove the current adapter and replace it. Screw the tub faucet onto the adapter until it is tightened and lines up correctly. Install the set screw if the new faucet has one. - Source: Internet
- To replace the shower head, you don’t even have to shut off the water supply. Just remove the old shower head by turning it counterclockwise. If you can’t do it by hand, use an adjustable wrench. Make sure the shower arm doesn’t turn inside the wall. - Source: Internet
- Showerhead, Arm, and Flange Most people are fairly familiar with showerheads but you’re planning your dream shower system so take this opportunity to get the exact showerhead you want! You can choose an overhead rain showerhead, an invigorating full body spray showerhead, a soothing Delta H2O kinetic showerhead, a multi-setting showerhead, or another great option! Spend some time thinking about what kind of shower arm you would like. Do you want the standard type where the shower arm sticks out of the wall so the water from the showerhead hits you at an angle? Or would you prefer a shower arm with a 90-degree bend so you can experience a falling rain effect. The shower flange is a small decorative piece with an important job, it covers the hole in your wall where the pipe sticks out! In the example shower system, we are showing Delta’s large overhead rain showerhead mounted to a shower arm with a bend. This bend helps accommodate for the thickness of showerhead and gives you more clearance. The decorative wall flange really completes the look. - Source: Internet
- At this point your ball joint is attached to either your shower head or shower faucet (step 4). Now it’s time to carefully tighten the other end of the ball joint into place – do not over exert force or use tools to tighten. Hand force is sufficient and highly suggested. - Source: Internet
- You may need to replace additional rubber washers in the shower stem connecting to the valve body. The shower stem is the part of the shower that the bottom of your shower hose connects to. These rubber washers are prone to wearing down and can easily be replaced whilst the valve body is disassembled. - Source: Internet
- Clean The Face Of The Shower Head - While you have the shower head uninstalled, it’s not a bad idea to get some of the scale and soap that may have built up on the surface and in the nozzles. We recommend submerging the shower head in a mixture of white vinegar and water for 30 minutes to an hour and then rinse with water. You can soak it longer if it’s got heavier build-up. - Source: Internet
- PEX column is now connected to the drop-ear elbow by using Teflon tape and adapters. Now screw down it to the horizontal stud. It should be screwed down where the showerhead from the other side will be. Also, be sure it is parallel with the valve below. For this job, use the electric screwdriver and fixate it. - Source: Internet
- At this point, you’ll have the hand shower hose connection installed on the right side of the shower arm diverter, and the shower head installed on the bottom. This is also the correct positioning if you’re installing a hand shower that will be on a slide bar. Place the hand shower into the bracket cover like a holster until you’re ready to use it. - Source: Internet
- To start installing a shower head faucet, you need to get to plumbing behind the wall. In case you have a particular door for this purpose, you can enter and do it from the other side. Since that option is not hard at all, you may consider yourself lucky because the people built your house were experts. - Source: Internet
- In most cases, you will find a cut-off shower valve in your bathroom. If you do not have it installed, the second option is to look for the main water valve. Since it is installed for the whole house, once you turn it off, be prepared that you won’t have water until you finish the job. - Source: Internet
- A great looking hand shower slide bar / grab bar combination helps provide bathroom and shower safety for you and your family. Creating a Delta ADA grab bar hand shower system is easy! Delta makes several styles of hand shower kits that include a grab bar. When you are planning your shower system, consider adding one so you can enjoy your new Delta grab bar shower system safely for many years to come! - Source: Internet
- A new accessory is a low-cost way to repair only the part in need. Sometimes when you take things apart, you find that there are more issues than you expect. Replace that calcified shower arm, stiff shower hose or sagging shower holder. - Source: Internet
- On this assembly page you will see two different methods of installation for your Clear Shower XL shower head. We recommend the first “suggested” install method below to ensure your Clear Shower XL shower head is installed properly (has a few extra steps). If you are a pro, we suggest you go ahead and try the 2nd install method at the bottom of the page using the “spin it” instructions. With this method install usually takes between 14-39 seconds. - Source: Internet
- Sometimes, it is necessary to wrap the Teflon tape around the other side of fillets where the showerhead will go. Then gently screw the head shower and tight it a bit more with adjustable screw wrench if necessary. A quarter of a turn will probably be OK. - Source: Internet
- Now, if you’re experiencing this, then you have some issues with a connection in your shower head. Depending on the type of shower head you have, there can be several areas that will spring a leak. Fortunately, these are typically low cost and easy fixes that you can do yourself. - Source: Internet
- Clean The Shower Arm - There will typically be a lot of old and worn thread seal tape wrapped around the shower arm and you’ll want to remove it. Just peel it off the arm and wipe it down with a cloth and some warm soapy water. If the shower arm is damaged or corroded, you’ll want to replace it. - Source: Internet
- Installing a shower and tub faucet is not as straightforward as installing a faucet on a sink. The main working part of the shower/tub faucet – the valve – goes behind the wall, and the parts that you see – the spout, handles and shower head – are considered trim. It follows that the best time to install a tub/shower faucet is before the wall gets covered. If you want to replace an existing one, you must either cut through the wall or use the access door left by a conscientious builder. - Source: Internet
- After measuring the height for the handle, you should also measure the height for the showerhead. Adjust it depending on your needs, approximately 72 to 78 inches (1.8 – 2 m) from the floor. - Source: Internet
- If there is an access panel on the shower or tub, remove it to see if there is a shutoff valve. If there is not, then you will need to shut off the water to the entire house. After turning off the water, confirm it is shut off by opening a faucet closest to where the water comes into your home and leaving it open. - Source: Internet
- Unscrew the Existing Showerhead If the showerhead is decades old, it could be corroded, and you will need to use a wrench to get it off. Turn the neck of the showerhead counter-clockwise to remove it. Be careful not to turn the pipe in the wall. If necessary, turn the showerhead by hand while holding the connecting pipe with soft-jaw pliers or a soft cloth. The Spruce / Kevin Norris - Source: Internet
- Inspect The Shower Head For Damage - If the threads or any area of the shower head, hose, or holder is cracked, split or generally compromised, you’ll need to buy a new replacement shower head or accessory. We cover your best options for this at the end of the article. - Source: Internet
- Most shower heads screw onto the pipe coming out the wall. Place a rag over the connection and use a pair of pliers to loosen and remove it. It should loosen by turning it counterclockwise or to the left. - Source: Internet
 Here are some recommendations for locating information about how to replace delta shower head faucet to get you started:
- Research How To Install Shower Plumbing Fixtures-related information from credible sources. This includes libraries, websites, and even journalistic professionals.
- When researching Cost To Install Shower Plumbing, it is vital to be aware of the numerous sorts of electronic media sources, such as Google and YouTube. Social media networks, such as Facebook and Twitter, are also likely to include information on How Much Does It Cost To Add A Shower Head To A Bathtub.
Here are some recommendations for locating information about how to replace delta shower head faucet to get you started:
- Research How To Install Shower Plumbing Fixtures-related information from credible sources. This includes libraries, websites, and even journalistic professionals.
- When researching Cost To Install Shower Plumbing, it is vital to be aware of the numerous sorts of electronic media sources, such as Google and YouTube. Social media networks, such as Facebook and Twitter, are also likely to include information on How Much Does It Cost To Add A Shower Head To A Bathtub.Video | How To Replace Shower Head And Faucet
To obtain the most accurate information on Shower Head Leaking At Wall, it is essential to investigate the credibility of each source by reading.
This page contains multiple cost to replace shower head and faucet-related films from a variety of sources, which can expand your understanding about How to Fix a Leaky Shower Head. Internet is an excellent resource for getting information on a range of subjects.
## Here are some crucial aspects concerning Shower Head Leaking At Wall:- How To Replace Shower Head And Faucet
- Cost To Replace Shower Head And Faucet
- How To Fix A Dripping Shower Head Faucet
- How To Install Shower Head And Faucet
- How To Replace Shower Head And Tub Faucet

With so many websites and forums giving how to replace delta shower head faucet-related information, it is not difficult to locate what you want.
This is a highly unconventional method for obtaining knowledge on How To Fix A Leaky Shower Faucet With Two Handles, compared to what most people are accustomed to. It permits a more in-depth examination of the content and application of information regarding Replacing Shower Valve Behind Wall.
 Methods for creating aesthetically pleasing and informative presentations of How To Install Shower Faucet Double Handle information. They can be utilized in business and marketing environments to convey messages regarding how to install shower head and faucet. Consequently, we additionally supply photographs regarding Cost To Fix Leaking Shower Head.
This article concludes by providing an overview of How To Install Shower Faucet Double Handle. In addition, How To Fix Shower Head Spray and How To Fix Shower Head Spray are discussed to compare your understanding of How To Change A Shower Head And Handle.
