Today’s topic is How To Install Kitchen Sink To Countertop. Obviously, you can find a great deal of How To Install Kitchen Sink Undermount-related content online. The proliferation of online platforms has streamlined our access to information.
There is a connection between the How To Attach Top Mount Sink To Granite Countertop and Undermount Sink Adhesive information. more searching has to be done for Undermount Sink Adhesive, which will also be related to Kitchen Sink Brackets.

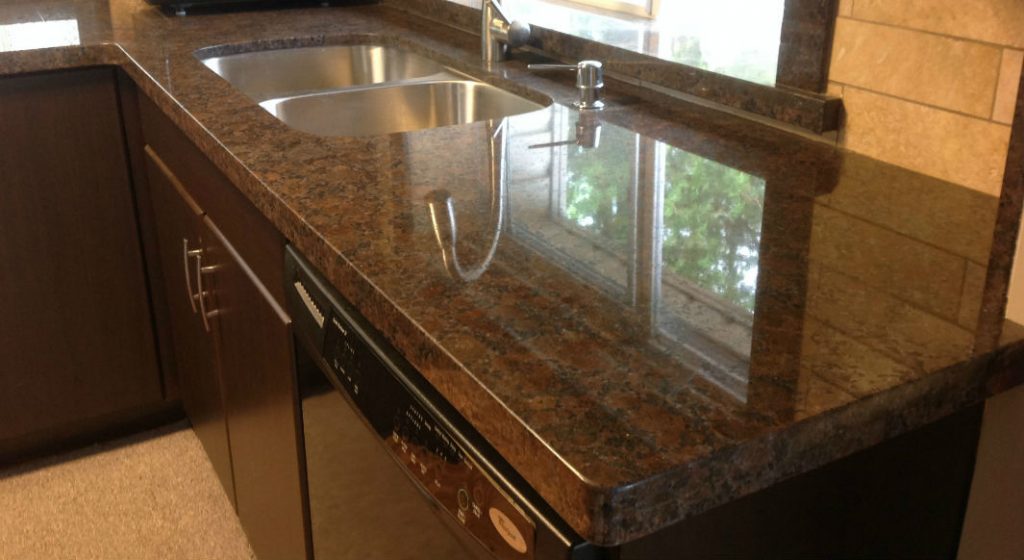
70 Tips for How To Install Kitchen Sink To Countertop | How to Install an Undermount Sink to a Granite Countertop
- If you have installed a garbage disposal, the drainpipe for the sink should go on the side of the unit. If there’s no such unit, then the drainpipe runs from the drain to the main drain line. Connect the drain pipes easily via p-trap pipes. Fasten each pipe, but do not overdo it. - Source: Internet
- If you fail to check the holes and their size, it will be stressful to install your kitchen sink. But the good news is that in the maximum cases, these holes are standard size, and they are placed in standard spots. However, checking them is still essential, so you don’t have to struggle during the installation process. - Source: Internet
- This is another problem you might run into. There are sinks with three holes to install the faucet and one hole designed for an accessory. You should make sure that all these holes are set in place. Otherwise, there will be a struggle to adjust them to how you need them to be. - Source: Internet
- Measure the trap adapter to either the 90 or the TY depending on what side you are measuring first. I like to measure from outside of fitting to outside of fitting and then add 1 1/4 inches. This will give you the right length every time. If your double sink is smaller on one side you will want to make sure the 90 and the TY will line up. - Source: Internet
- I get two types of clients. The first one says I need a plumber to come and install my faucet and hook up my sink and install my garburator. The second one says I tried to hook up my sink drain but nothing matches can you come and install everything for me. - Source: Internet
- Next, drill four holes at the four corners of your marking. For a round sink, drill the openings at opposite sides of the circle. Make sure the countertop has excellent support and use the jigsaw to cut it, starting from one of the holes you’ve made. You need a good base, so the countertop doesn’t break while trying to make an even cut. If you need any assistance with your kitchen installation projects, don’t hesitate to call a professional. - Source: Internet
- Fitting an under-mount sink is the same, except that the caulk goes in a different place. With this type of sink, you add the caulk on top of the sink. Spread it evenly around the top and place the sink underneath the countertop. Use something for a base to support the sink while it glues. - Source: Internet
- We will schedule our laser measure team to come measure your space for your new countertops before we go into production. This can be scheduled either in the morning or the afternoon on whichever day is best for you. Plan on a 4 hour window for them to arrive. The team will call you when they are about 45 minutes out. Once we have the results from the measure, we will put your job into production. - Source: Internet
- The best thing about undermount sinks is that they can be used with any type of stone countertop. Whether you have a marble countertop, a quartz countertop or a granite countertop, undermount sinks can be installed without any problems. Wondering how to install drop-in sink on granite countertop? Look through the guide below. - Source: Internet
- If you haven’t done this already, now is the time. Detach the p-trap pipes and drain pipe from underneath the sink. Also, make sure to remove any other kitchen sink parts before proceeding with changing the sink. - Source: Internet
- Fabrication of your new countertops will be done in our shop. We use CNC machines and routers to cut and polish our countertops so this step usually only takes a few days. Once we have started fabricating your countertops we will put you on the schedule for installation. - Source: Internet
- It is possible that some amount of water will be left in the pipes, so drain them well. Place a bucket under the sink and let the water run. When nothing’s left, turn off the tap and remove the bucket. - Source: Internet
- I live in the Denver suburbs and moved into the new “used” home. I was spoiled with an amazing sink in my last home and feel frustrated with this builder grade sink with 2 small bowls in the center of my massive island. Has anyone had a stoneworker cut a new sized hole into their installed granite to allow a bigger or different sized sink? Is this even done? suggestions? - Source: Internet
- When the caulk is set, reattach the metal sink clips you removed from the previous sink. Again, place them underneath the sink and tighten well to fit the sink into place. Once you fit the sink, you may proceed with installing the tap. - Source: Internet
- Undermount sinks are aesthetically pleasing to the eye and give a contemporary look. However, this type needs experienced hands for the installation. The sink should ultimately be inside the Countertop, and no imperfections should be visible. - Source: Internet
- Your choice of a reveal style should be based mostly on your visual preference. Most fabricators I know prefer the zero reveal style—arguing that it’s the cleanest. Some experts say that a positive reveal just gives you another narrow, hard-to-clean surface around your sink (and believe me, it’ll get dirty as you become accustomed to sponging messes from the countertop right into your undermount sink). A negative reveal also produces a hard-to-clean surface on the counter underside where dirt, grease and germs are likely to build up unseen. - Source: Internet
- Since you’re not going to cut the sink opening yourself, you’ll need to tell your countertop fabricator which sink and faucet you plan to install, and which reveal style (more on this in a moment) you prefer so he or she can cut the opening to the correct size and shape. Choose a sink that fits into the base cabinet below the counter with some room to spare. Your fabricator will work from a sink template, usually available from the manufacturer. - Source: Internet
- Turn over the top-mounting sink and apply caulk on the wider part. Then flip the sink and place it carefully in the hole. If there’s excess caulking, remove it. - Source: Internet
- All our countertops at Marble and Granite work with undermount sinks. Ultimately, undermount sinks can be used with any type of stone countertop, whether its marble, granite or quartz. Their installation won’t present any real problems for a professional contractor and you could even handle the job yourself if you’re handy enough. - Source: Internet
- While it is possible to install an undermount kitchen sink yourself, we suggest you call on professional help from installation experts if you are in any doubt. Undermount installation techniques depend on the type of counter and sink. The materials can be heavy and cumbersome. Finally, manufacturers’ products and accessories may involve techniques that are different from those presented here. For more information, refer to the supplier installation manuals. - Source: Internet
- You might want to consider the condition that your countertop is in. Depending on how your old kitchen sink was functioning, your countertop might be swollen. This is a consequence of a leaking kitchen sink. - Source: Internet
- Measure the length from the drain to the new sink, so you know how long you need it to be. Buy or cut a pre-bought pipe to the exact measurements. Place a washer over the end of the pipe. Place slip nuts at both ends of the pipe or on which it’s necessary. Put the drainpipe in place and screw the slip nut/s in. - Source: Internet
- This should be done before installing the countertop. Clips are included with your sink. Your countertop fabricator will supply the proper hardware to attach the sink to the countertop. Solid surface countertop hardware requirements may vary. - Source: Internet
- Undermount sinks install to the bottom of the countertop. Installers place the sink in the cabinet underneath the sink opening before applying the adhesive. After applying the silicone adhesive, the installer lifts the sink until it makes contact with the underside of the countertop. Depending on the amount of drain openings, one or two bar clamps and a cross brace hold the sink into place. One end of the bar clamp grabs the bottom of the sink through the sink drain opening while the other end attaches to the cross brace. - Source: Internet
- On average, for a standard sink sized 80cm x 55cm x 20cm, it can take a professional installer between 1,5h and 2h. There are, however, several factors that come into play with this task at hand. For example, how easily the old sink is removed, how much work they need on the hole, and whether the pipes need to be replaced as well. - Source: Internet
- Check for cracking or moldy caulking, and replace it if you see an issue. You are supposed to recaulk every three to five years to ensure that your undermount sink will last a long time. If taken care of properly, it’s going to stay there for life and it doesn’t weaken or damage your granite countertop the slightest. Undermount sinks on granite countertops are an asset to a home which is why it is so popular these days. - Source: Internet
- Measure the sink opening in your granite countertop. Normally, it will be 33 X 22 inches from outside the rims. Take the measurements with you when you go to your local home improvement center when it’s time for you to select your new sink. - Source: Internet
- First, take the measurements of the bottom of the sink. Mark the proper dimension with a graphite pencil and a ruler. Keep in mind that you shouldn’t take the measurements from the wider top side of the sink. The wider part lays on top of the kitchen counter and is used to glue down the sink. - Source: Internet
- To sum up, if you’re looking for another DIY project, hopefully, this definitive guide will help you accomplish your kitchen sink installation. Follow the above-listed steps for each part of the process and the task should go smoothly. The most important things to keep in mind when replacing a sink are: - Source: Internet
- Next, you have to unscrew the metal clips. They are located underneath the sink for both top and under-mount sinks. After you remove the clips, you need to cut the caulk. The difference between the two types of sinks is caulk’s location. For under-mount sinks, it’s located underneath the sink where the metal clips are, whereas, for top-mounted sinks, it’s on top where the wider part of the sink meets the counter. - Source: Internet
- If you decided to install your kitchen sink by yourself, you should know that this is not complicated. But there are various mistakes that you should avoid in the process. We would recommend the - Source: Internet
- If you need help you can call Granite Selections to assist you in installing your undermount sink. To learn more about us give a call at (888) 906 3317. We’ll be happy to help you! - Source: Internet
- In this article I will explain to you how you can hook up your own sink. Of course if this is something you do not want to waster your time with I can come by and hook-up your sink for you. Call 780-264-0878 - Source: Internet
- First things first, you should start with getting your undermount sink ready for installation. Make sure that your sink is the proper size for your countertop. Don’t forget to get every clip and mounting kit needed to install an undermount sink. - Source: Internet
- Replacing a kitchen sink is straightforward, but also a time-consuming task. There are sinks of all shapes, sizes and materials, some of which are trickier to work with than others. In this guide, we will tell you how to replace a kitchen sink. - Source: Internet
- To stay away from such discomfort, it is essential to have the right measurements. Measure the size of your cabinet as well as the depth you have available for your sink. Write all these sizes down before you decide what type of sink you need for your kitchen. Installation should be smooth if you cover this aspect. - Source: Internet
- In this bathroom countertop type, the hole is usually precut to adjust the whole sink in it. If you do not have prior experience cutting counters, you should buy a countertop with the precut whole. - Source: Internet
- An undermount sink should be attached to the countertop before it’s installed on the base cabinets. It’s awkward to do it otherwise—there’s typically not enough space inside the sink base cabinet to do what you need to do. If for some reason you need to install the sink with the top in place—or reset an existing undermount sink that has separated from the underside of the counter— you’re probably going to have to cut the cabinet sides to gain access to clip fittings that secure the sink against the underside of the counter. Installing the faucet will be a pain, too. - Source: Internet
- When you have a negative reveal, a portion of the countertop underside is exposed to splashing water. This is a problem with granite countertops since granite is a porous material which means that water can seep through it and the sink area has a large chance of becoming a breeding ground for mold. To avoid this, make sure that your granite countertop is sealed on all sides. - Source: Internet
- There are a few things you’ll need to consider regarding your countertop installation process. If you are replacing existing countertops, you’ll need to decide who is going to do the demo. You might want to do it yourself or have your contractor do it. If you would like us to do the demo let us know and we will add it into your bid. - Source: Internet
- Another problem area is the gap between the sink and the granite. Even with a zero reveal, which means that the sink is attached to the sink as closely as possible, there is still a little bit of a gap that you have to caulk with silicone. This silicon caulk has the potential to build up food or grime over time. You have to take time every other week to clean this to avoid any germs from building up there. - Source: Internet
- Invert the sink and apply silicone to prevent water leakage underneath. Then flip it and put the plumbing supply lines in the central hole. Place the sink in its required position and fix its mounting screws underside. Then move on to make the plumbing connections accordingly. - Source: Internet
- Determine where the sink should be positioned on the countertop. Make sure there’s enough clearance on all sides of the sink. Underneath the countertop, carefully tape the template to the countertop and use the appropriate saw to cut the hole. If you want a negative review, cut the hole slightly smaller than the template. For a positive reveal, cut slightly larger… and for a flush mount cut the exact measurement of the template. - Source: Internet
- If you are having granite countertops installed, the crew will seal them before they leave. Quartz and solid surface countertops never need to be sealed. Learn more about the care of countertops here. - Source: Internet
- Measuring your space, such as the countertop before installing your sink, is essential. If you don’t have the correct sizes, you will end up dealing with issues during installation. You might notice that the basin of your sink is too deep compared to the space you have. - Source: Internet
- Use silicone to fix the Bathroom countertop in place. Apply it roughly at first, and then set your precut Countertop. Fix the edges with silicone as well and press the Countertop to secure its position firmly. - Source: Internet
- Slip the clip brackets onto the mounting studs and over the sink rim. Tighten the wingnuts finger-tight. Over-tightening risks cracking the countertop. - Source: Internet
- If your countertops include sink cut outs we will need your sink onsite in order to accurately template the cut out. If you are getting a sink from us there is nothing you need to do. If you are using your own sink, you will need to drop it off at our shop. - Source: Internet
- You can reuse your existing sinks and faucets or upgrade to a new one. AAA Countertops carries several styles of kitchen and bathroom sinks but you are free to use any sink you choose. One thing to keep in mind is that you will need to schedule a licensed plumber to disconnect and reconnect your sinks plumbing. - Source: Internet
- About the author: From his past experience as a contractor and cabinetmaker, Michael Chotiner has accumulated some great “pro how-to” knowledge that he likes to share for The Home Depot. To see a wide array of under-mount and over-mount kitchen sinks, visit homedepot.com. - Source: Internet
- As with any DIY projects, it becomes a lot easier if you know what you’re doing. This means you have to read and research before you start installing your undermount sink to avoid big problems. Always be sure to read your instruction manual that comes with the sink and don’t be afraid to ask a friend to help you with the heavy lifting. - Source: Internet
- Moreover, maybe the sink you purchase will not provide the space that the contractor allowed for it because of a significant difference in height. You might have to cut the cabinets and make sure the sink fits them. In some cases, when the difference in height is too big, you might have to remove the cabinet altogether. - Source: Internet
- When your countertop arrives—holes and all— you should have a work stand set up to support the counter so that you can work above and below without flexing and cracking it. Depending on the length and weight of the top, you might be able to get away with setting a couple of two-bys across sawhorses. A table frame minus a tabletop might also work. - Source: Internet
- If you have garbage disposal under the sink and/or a dishwasher, disconnect them, as well. If you have a water filtration system, disconnect it from the tap, too. To do so for either appliance, you may want to check their instructions first. - Source: Internet
- Checking if your countertop is swollen will help you decide whether or not you should replace it first. It is important not to install your new kitchen sink on a damaged countertop. Your kitchen sink needs a solid base that it can rely on, so you will not have problems afterward. - Source: Internet
- Granite and stone countertops are very heavy. The sink needs to be fitted under the counter once the counter is in place on the cabinets. This involves working inside the cabinets under the countertop, which makes the task a little more complicated. - Source: Internet
- The second benefit is that undermount sinks are deeper than any other model types. The average topmount sink is approximately 5 inches deep compared to an undermount sink which is about 10 inches deep. This gives you more room for washing food and dishes in your sink. With that amount of room, you can even wash your small dog there if you want. So undermount sinks and granite countertops do belong together. - Source: Internet
- When you have your new countertops installed the common practice is to install an under mount kitchen sink. The countertop company will do this for you, and they will tell you when the plumbing can be hooked up. Normally either right away or 20 to 24 hours later. Depending on the company and whether they strap the sink to secure it in place and silicone or just use silicone. - Source: Internet
- Your pipes should be clean when you install your kitchen sink. If you don’t do that, you will face several problems with your sink. One of these problems will be that it will get clogged fast. If that happens, it won’t be easy to unclog it once your sink is installed. - Source: Internet
- The day before your countertops are scheduled to be installed, we recommend removing items from your drawers and cabinets. If you don’t want to remove everything, you can alternatively cover your interior items with plastic. Though not necessary, this will keep your items from getting dusty from the countertop installation process. - Source: Internet
- Some installers prefer to mount the sink working with the countertop right-side up. Doing so gives you a better view of the fit and look of the reveals during the final stages as the sink clips are tightened to retain the sink rim on the underside of the counter. It’s also what you have to do if you’re trying to re-install an existing undermount sink that’s delaminated and falling away from the countertop. - Source: Internet
- With the undermount sink in place, mark the potions where the holes need to be drilled on the countertop. Take the sink out, and use a drill to put holes in the marked spots. Then clean the ridge with denatured alcohol and allow it to dry. - Source: Internet
- Vessel sinks are fancy, beautiful, and perfect for your bathroom. They need less work during installation and go with the Countertop well. These sinks remain above, and hence minor cuts in the Countertop suffice nicely. - Source: Internet
- If you want to make a big impact on the look and appeal of your kitchen or bathroom there’s no better way to start than upgrading your countertops. Countertops make a huge visual impression, especially in a small space. If you’re worried that the process will be overwhelming or complex, you can stop stressing right now! Replacing your old countertops with new stone, quartz or solid surface tops is very straight forward and one of the easier home remodel projects you can do. Here’s what you can expect from the countertop installation process. - Source: Internet
- Next is to apply a thin layer of sealant to the sink lip and place the sink in from underneath. Adjust it into position under the granite. Be sure to use clear caulking when working on your granite countertop especially if the stone is dark in color. This will give it a cleaner and more professional appearance once the project is done. - Source: Internet
- Attaching a bathroom sink to its vanity countertop is not rocket science. The installation process is relatively easy, provided you have basic skills and tools. An average person can easily take it as a DIY project with correct instruction in hand. This article will provide you a step-by-step procedure for attaching the bathroom sink to the Countertop. - Source: Internet
- The first step to replacing a kitchen sink is to remove the old one. This job needs to be handled gingerly, so you do not damage the countertop or the new sink. If you’re not 100% certain in your DIY plumbing skills, we advise you to get in touch with expert plumbing services professionals and have them change the sink. - Source: Internet
- After you complete the undermount kitchen sink installation, it’s crucial to check if everything is adjusted and works as it should. Carefully examine everything, then pull and push the sink slightly to ensure that both the alignment and sealing are done correctly. Don’t forget to turn on the water to make sure that there is no leakage and that the water drains out properly. - Source: Internet
- Undermount sinks look good with granite countertops. It adds a modern look to your bathroom or kitchen while simplifying countertop cleanup. Before we discuss the details of installing your undermount sink on a granite countertop, let’s first go through the general ideas of the project. - Source: Internet
- Your estimate will include the cost for all material and labor. If you are purchasing a sink from us or if you would like us to demo your existing tops, these costs can be included as well. Review the estimate carefully. If everything looks good, sign the estimate and return it to us and we will schedule step 3…… - Source: Internet
 Following are some suggestions on where to begin your search for data on how to attach kitchen sink to granite countertop:
You should try to find How To Install Undermount Sink Clips In Granite-related information from reputable places. Libraries, online resources, and even paid journalists all fall under this category.
Following are some suggestions on where to begin your search for data on how to attach kitchen sink to granite countertop:
You should try to find How To Install Undermount Sink Clips In Granite-related information from reputable places. Libraries, online resources, and even paid journalists all fall under this category.It’s crucial to be aware of the many electronic media sources available when researching Kitchen Sink Fitting Kit, such as Google and YouTube. You may also get info about how to install kitchen sink into countertop on social media sites like Facebook and Twitter.
Video | How To Install Kitchen Sink To Countertop
It’s crucial to read to examine the authenticity of each source in order to acquire the greatest information regarding Installing a Kitchen Sink Without Hardware. You’ll learn more about Undermount Sink Adhesive after watching the films included in this post, which come from a variety of different sources. Information on a wide range of topics may be easily accessed via the internet.
## Notable features of Drop-In Kitchen Sink With Granite Countertop include:- How To Install Kitchen Sink To Countertop
- How To Install Kitchen Sink In New Countertop
- How To Attach Kitchen Sink To Countertop
- How To Install Kitchen Sink To Granite Countertop
- How To Install Kitchen Sink Into Countertop

Because there are so many websites and forums that provide information about How To Attach Bathroom Sink To Countertop, it should not be difficult for you to locate the data that you want.
The majority of individuals are accustomed to taking a completely different approach when it comes to obtaining information regarding How To Install A Kitchen Sink In A New Countertop. This makes it possible to take a more in-depth look at the information that is available about how to attach kitchen sink to granite countertop and how it might be utilized.

methods for producing information displays about how to install kitchen sink in new countertop that are both aesthetically pleasing and functional. In commercial and marketing settings, as well as for the purpose of conveying information on How To Attach Porcelain Sink To Granite Countertop, they are useful tools to have. Because of this, we also supply some photographs relating to What Is The Best Adhesive For Undermount Sink To Granite.
In summing up, I’d like to say that this article offers a general summary of Installing a Kitchen Sink Without Hardware. Also covered are How To Install A Kitchen Countertop and How To Install Kitchen Sink Undermount, which serve as a benchmark for evaluating the depth of your understanding of How To Attach Top Mount Sink To Granite Countertop.
