Today’s topic is How To Measure Amps On A Battery With A Multimeter. Obviously, you can find a great deal of How To Measure Mah Of Battery-related content online. The proliferation of online platforms has streamlined our access to information.
There is a connection between the How To Measure Amps With A Multimeter and how to measure amps on a battery with a multimeter information. additional searching needs to be done for Multimeter 9V Battery Test, which will also be related to Multimeter 9V Battery Test.

63 Reference List: How To Measure Amps On A Battery With A Multimeter | How to Use a Multimeter, Part 4: Measuring Current (amperage)
- Note that there’s a way around all of this: You can buy what’s called a “current clamp meter,” which has a set of hinged jaws that surround the cable whose current you want to measure. It then senses the electric field inductively without your having to “splice” the meter into the circuit. These come in a few different flavors. There are clamp meters that only measure current, general purpose multimeters with integrated clamps, and clamp attachments that plug into standard meters. - Source: Internet
- Here at Battle Born, our products are primarily used for off-grid energy storage at 12, 24, or 48 volts. However, inverters are commonly used in battery systems that run at 120 or 240V AC. When shopping for a multimeter, we recommend getting an auto-range multimeter. This means that the multimeter will automatically select the range of measurement and display it on the screen. - Source: Internet
- Note: Mind the polarity while using an analog multimeter to measure DC current. It will not show any deflection when connected with opposite polarity. It may cause damage to the meter. - Source: Internet
- In the figure below, the above steps have been taken, and the multimeter is reading 64.6 mA (milliamps) on its sensitive setting, which is a minor parasitic draw that I’ve simulated by leaving the car’s dome light on. On a modern car with control modules, 70mA is usually considered an acceptable parasitic drain, but less than 30mA is even better. - Source: Internet
- Having a multimeter can help you better understand how your electrical system functions. However, knowing how to use it properly is equally important as owning it. If you learn how to use it, you can diagnose some electrical issues yourself and even fix them. However, always reach out to a certified professional when in doubt to avoid making a costly mistake. - Source: Internet
- A multimeter is a handy tool that you use to measure electricity, just like you would use a ruler to measure distance, a stopwatch to measure time, or a scale to measure weight. The neat thing about a multimeter is that unlike a ruler, watch, or scale, it can measure different things — kind of like a multi-tool. Most multimeters have a knob on the front that lets you select what you want to measure. Below is a picture of a typical multimeter. There are many different multimeter models; visit the multimeter gallery for labeled pictures of additional models. - Source: Internet
- The digital multimeter will send a small voltage through the circuit to play a tone. Attach one lead to one end, and the other test lead to a pin on the other end. You’ll hear the tone if the connection is fine. If there is no tone, you’ll need to do a bit more investigating of that connection to figure out why it’s not connected. - Source: Internet
- A digital multimeter is a standard piece of equipment used by technicians when working with electrical connections. These devices can measure two or more electrical values. These values may include voltage, current, and resistance. - Source: Internet
- You can use it for lots of different tasks when you know how to use a multimeter. It’s so essential that every electrician will always have one and it’s usually the first tool used. This tool is essential, and anyone with a toolbox should make sure they have one in it. - Source: Internet
- Using a digital multimeter can help you isolate and locate faults in an electrical system. This could be disconnected wires, wires connected in the wrong way, or shorted together. These faults can be dangerous if not addressed. Smoke, sparks, and fire are all risks when you have faults in your system. A digital multimeter can help you quickly isolate the problem and address it before it becomes a significant issue. - Source: Internet
- Advanced multimeters might have other functions, such as the ability to measure and identify other electrical components, like transistors or capacitors. Since not all multimeters have these features, we will not cover them in this tutorial. You can read your multimeter’s manual if you need to use these features. - Source: Internet
- First, we discussed how to use a multimeter for measuring voltage, or simply verifying that voltage is present. Last week, we addressed measuring resistance—verifying that a wire is continuous and not broken somewhere. Today we’re discussing how to use a meter to measure current, also referred to as amperage. - Source: Internet
- Test the alternator. The alternator generates electricity for your car’s electrical components and charges your battery while the vehicle is running. While idling, turn on the car’s headlights, stereo and air conditioner. If the multimeter displays less than 13.5 volts, then your alternator is struggling to charge the battery and you should consider replacing it. - Source: Internet
- If you’re using a multimeter that’s not rated for the voltage you’re measuring, arc flash can occur. This is where the electrical current leaves the path and travels from one conductor to another. This can result in serious injuries and even death. Usually, most meters are rated for 600volts but always know the limits. - Source: Internet
- You might have noticed some other symbols besides V, A, Ω, and metric prefixes on the front of your multimeter. We’ll explain some of those symbols here, but remember, all multimeters are different, so we cannot cover every possible option in this tutorial. Check your multimeter’s manual if you still can’t figure out what one of the symbols means. You can also browse our multimeter gallery to see labeled pictures of different multimeters. - Source: Internet
- One of the most basic household purposes to use a multimeter is battery testing. The simplest way to check a (AA) battery, is generally used in remote control of the TV. To check whether it is in good condition or not, connect it to a multimeter’s test probes and measure its voltage or amperage. If you have wondered how to test a battery with a multimeter, this guide will walk you through it. - Source: Internet
- Hook the multimeter leads up to a speaker using speaker wire, and set the multimeter to measure AC amps (or AC volts if AC amps is not available). Who can get the multimeter to display the biggest number by yelling into the speaker? (In this case, the speaker is working like a microphone, generating current when it detects sound.) - Source: Internet
- You might be in for a shocking surprise if you’re working with electricity and don’t know how to use a digital multimeter. Safety is one thing that you can never ignore when working with electricity. While a multimeter can help you avoid getting electrocuted, it can also be handy in diagnosing electrical issues, building circuits, and testing operations. - Source: Internet
- Remember, this gallery is meant to be a general guide; if you do not see your model of multimeter pictured here, your best bet is to consult your specific multimeter’s manual. If you need help getting introduced to multimeters in general, refer back to our Multimeter Overview section. If you need to know how to take a specific type of measurement, refer to the Using a Multimeter section. - Source: Internet
- You must keep your probes straight when connecting to the meter. Attaching the wrong probe to the wrong plug can cause serious damage to your electronics and multimeter. Black always goes in COM and red only goes in voltage/resistance measurement. Accidently putting it in the amp port can cause a short. - Source: Internet
- Instructions for changing the fuse vary with each multimeter model, so you will need to check your multimeter’s manual for instructions. This tutorial from SparkFun provides directions for changing a fuse on their brand of multimeter, but remember that these directions might not apply to your model. Note that in some multimeters-especially in inexpensive ones-you might not be able to change the fuse. - Source: Internet
- The diode check feature is useful to determine in which direction electricity flows through a diode. The exact operation of the “diode check” function will vary for different multimeters, and some multimeters do not have a diode check feature at all. Because of this variety, and because the feature is not required for most Science Buddies projects, we have not included directions here. If you need to do a diode check, consult the manual for your multimeter. - Source: Internet
- Plug the red probe of the multimeter into its positive port. Connect the black probe of the multimeter into its negative port. The negative port may be labelled “COM” for common ground. - Source: Internet
- You might be confused by all the symbols on the front of your multimeter, especially if you don’t actually see words like “voltage,” “current,” and “resistance” spelled out anywhere. Don’t worry! Remember from the “What are voltage, current, and resistance?” section that voltage, current, and resistance have units of volts, amps, and ohms, which are represented by V, A, and Ω respectively. Most multimeters use these abbreviations instead of spelling out words. Your multimeter might have some other symbols, which we will discuss below. - Source: Internet
- Measuring resistance with a digital multimeter makes it easy to diagnose failing components. You can identify a failing circuit or other components by the amount of resistance present. If a circuit or component has low resistance, it will have a high current flow. However, a higher resistance will result in a low flow of current. - Source: Internet
- If your multimeter is not auto-ranging, you might need to adjust the range. If your multimeter’s screen just reads “0,” then the range you have selected is probably too high. If the screen reads “OVER,” “OL,” or “1” (these are different ways of saying “overload”), then the range you have selected is too low. If this happens, adjust your range up or down as necessary. Remember that you might need to consult your multimeter’s manual for specifics about your model. - Source: Internet
- 3 – Multimeters come with a red (positive) and black (negative) lead. Some multimeters used for other testing may have dragon clips or alligator clips. For testing a car battery, the leads are best if they are of the point end probe type. - Source: Internet
- The photo below shows the meter measuring current on a small fan in a circuit that we’ve removed from a car for clarity. The positive battery terminal is connected to the positive terminal of the fan. The fan’s negative terminal is connected to the meter’s red lead, and the meter’s black lead is connected to the negative battery terminal. You can’t read the meter’s display, but it is showing about 5 amps. - Source: Internet
- Figure 4. A typical pair of multimeter probes. A typical pair of multimeter probes. - Source: Internet
- Do you have anything you can take apart with a circuit board inside, like an old toy, or a TV remote? Use the continuity check on your multimeter (if it has one) to test which parts of the circuit are directly connected to each other. ( Warning: Old circuit boards are constructed with a lead-based solder, which is toxic. Always wash your hands carefully after handling solder, and check your local waste disposal guidelines to see if there are special rules about disposing of lead as hazardous waste.) - Source: Internet
- Finally, read the number that appears on the multimeter display. This is the voltage of your battery. - Source: Internet
- The first digital multimeter hit the market in 1977 from Fluke. These devices are superior to the previous analog needle-based meters. They’re incredibly accurate, reliable, and easy to use. - Source: Internet
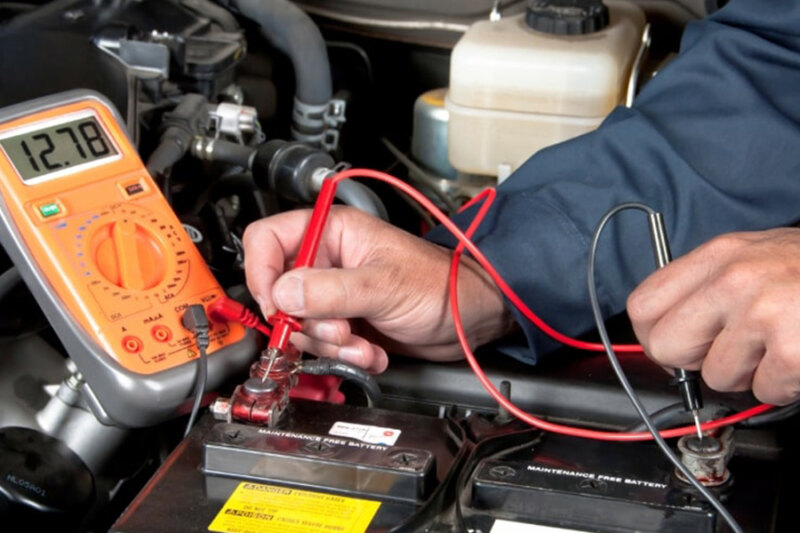
- First, you will need to connect the positive lead of the multimeter to the positive terminal of the battery. Next, you will need to connect the negative lead of the multimeter to the negative terminal of the battery. Finally, you will need to turn on the multimeter and set it to the amperage setting. - Source: Internet
- The multimeter will then display the current amperage of the battery. If the battery is able to provide enough power to start your vehicle, the amperage should be around 12 volts. If the amperage is lower than 12 volts, it may not be able to provide enough power to start your vehicle. - Source: Internet
- Some multimeters also have a diode check function. A diode is like a one-way valve that only lets electricity flow in one direction. The exact function of the diode check can vary from multimeter to multimeter. If you’re working with a diode and can’t tell which way it goes in the circuit, or if you’re not sure the diode is working properly, the check feature can be quite handy. If your multimeter has a diode check function, read the manual to find out exactly how it works. - Source: Internet
- Old circuit boards are constructed with a lead-based solder, which is toxic. Always wash your hands carefully after handling solder, and check your local waste disposal guidelines to see if there are special rules about disposing of lead as hazardous waste.) Set your multimeter to measure resistance, and have everyone in your house take turns grabbing the metal tips of the probes (one in each hand). Who has the highest resistance? The lowest? - Source: Internet
- Do you have a multimeter but are confused about how to use it or are getting unexpected readings? If so, the sections below will help you sort through what to do. If there are words or concepts you do not understand, or symbols on your multimeter that puzzle you, return to the Multimeter Overview tab. If you are looking for multimeter usage ideas or labeled photographs of assorted multimeter models, then visit the other tabs in this multimeter tutorial. - Source: Internet
- You can’t be too safe when using a digital multimeter. You should keep in mind several safety tips when using a digital multimeter. Let’s take a look! - Source: Internet
- Although they come with two probes, many multimeters have more than two places in which to plug the probes, which can cause some confusion. Exactly where you plug the probes in will depend on what you want to measure (voltage, current, resistance, continuity test, or diode test) and the type of multimeter you have. We have provided one example in the images below—and you can check our gallery for a multimeter similar to yours—but since all multimeters are slightly different, you might need to consult the manual for your multimeter. - Source: Internet
- In order to check the fuse, connect the multimeter in resistance mode by turning the selector knob. Place the probes in the “COM” and “mAVΩ” socket if your meter has the same socket for voltage, resistance and low current measurement. If your meter has a dedicated socket for low current measurement then place the black probe in VΩ socket and the red probe in the mA socket. - Source: Internet
- How to Do It: You can leave jacks plugged into the same position as the DC voltage, but you need to adjust your digital multimeter to read AC voltage instead of DC voltage (unless auto-ranging). Like with the DC voltage, adjust the multimeter based on the number of volts you’re measuring. When unsure, start at the highest setting and work your way down. - Source: Internet
- use a multimeter to test electricity from the wall outlets in your home. Electricity from wall outlets is very dangerous and can be fatal. Do not connect the probes directly to a battery or other power supply when you have a “current” measurement setting selected. This will cause a “short circuit” across the battery terminals, and a very high current will flow through your multimeter. This will probably blow a fuse, or possibly damage the multimeter. - Source: Internet
- How to Do It: As with all measurements, you need to set your multimeter to the setting just above the measurement you expect to see. Touch the probes to either end of the connection or the wiring you wish to test. If the multimeter reads “1” or “OL, ” you need to move down the measurement scale. Once you reach a low enough setting on the multimeter for the connection, it should display a number. If there is a large amount of resistance, it could result from dirt and debris or other foreign substances. - Source: Internet
- Your multimeter probably came with red and black wires that look something like the ones in Figure 4. These wires are called probes or leads (pronounced “leeds”). One end of the lead is called a banana jack; this end plugs into your multimeter (Note: some multimeters have pin jacks, which are smaller than banana jacks; if you need to buy replacement probes, be sure to check your multimeter’s manual to find out which kind you need). The other end is called the probe tip; this is the end you use to test your circuit. Following standard electronics convention, the red probe is used for positive, and the black probe is used for negative. - Source: Internet
- Place your black probe into the common jack and the red plug into the jack labeled for DC voltage. You can then touch the black probe to the negative side of the circuit and the red probe to the positive terminal. The digital multimeter will display how many volts are in the battery. Its ok if the probes are connected backward the voltage will just read negative. - Source: Internet
- Figure 3. The multimeter on the left is manual-ranging, with many different options (indicated by metric prefixes) for measuring different amounts of voltage, current, and resistance. The multimeter on the right is auto-ranging (note how it has fewer options for the selection knob), meaning it will automatically select the appropriate range. The multimeter on the left is manual-ranging, with many different options (indicated by metric prefixes) for measuring different amounts of voltage, current, and resistance. The multimeter on the right is auto-ranging (note how it has fewer options for the selection knob), meaning it will automatically select the appropriate range. - Source: Internet
- The same value might appear differently when measured with a different scale selected on the multimeter dial. For an example, let’s use measuring the DC voltage from a AA battery—which we expect to be 1.5V—using a multimeter that has settings for 200mV, 2V, 20V, 200V, and 600V. When measuring the battery with each setting, we get these readings: - Source: Internet
- You will probably need to open up your multimeter to access the fuses (Important: Always disconnect the probes before you do this). Some multimeters have covers that will pop or slide off, and some have screws that must be removed first. Fuses usually look like small, glass cylinders with metal caps on the end and a thin wire running down the middle: - Source: Internet
- Set the multimeter. Don’t be intimidated by all the settings because the general idea is simple. Turn your multimeter dial to the 20-volts setting. Touch the red probe to the red terminal and the black probe to the black terminal. - Source: Internet
- Most multimeters also use metric prefixes. Metric prefixes work the same way with units of electricity as they do with other units you might be more familiar with, like distance and mass. For example, you probably know that a meter is a unit of distance, a kilometer is one thousand meters, and a millimeter is one thousandth of a meter. The same applies to milligrams, grams, and kilograms for mass. Here are the common metric prefixes you will find on most multimeters (for a complete list, see the References tab): - Source: Internet
- If you need to use a multimeter, make sure you’re using it correctly. Using your digital multimeter incorrectly can damage your multimeter and provide inaccurate readings. Let’s look at how you can use your multimeter to take a handful of simple measurements. - Source: Internet
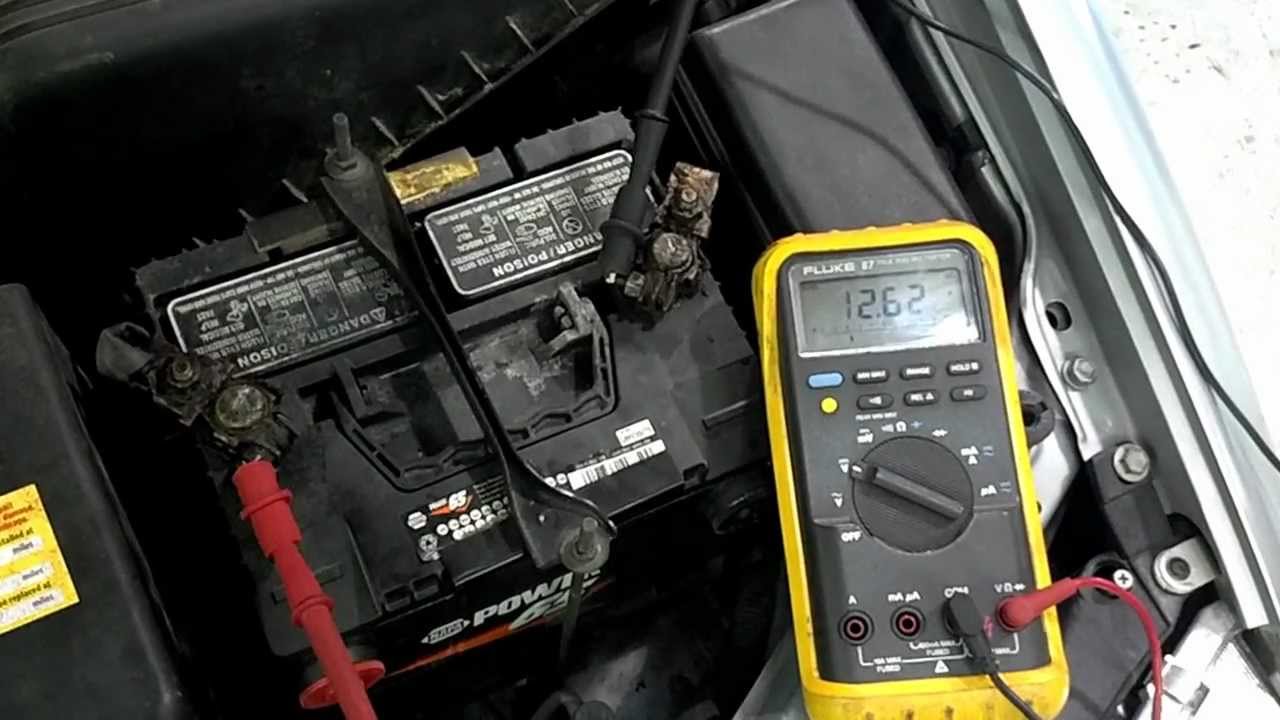
- We have observed our reading is 14.73, which is also an excellent number for the cold-cranking amps value. If the initial reading is around 5V, your battery is working but will go bad. If the measured value is below 5V, now you should replace your battery. - Source: Internet
- The left image is a multimeter with no probes inserted. The center image is a multimeter that has a black probe inserted into the center port and a red probe inserted into the right-most port. This setup is rated to measure current under 200 milliamps. The right image shows a multimeter that has a black probe inserted into the center port and a red probe inserted into the left-most port. This setup is rated to measure current up to 10 amps. - Source: Internet
- Turn on the digital multimeter and switch its measurement dial to the direct current (DC) measurement setting, since all batteries produce DC current. The DC current setting is denoted by the capital letter “A” with straight lines above it. The “A” stands for the basic unit of current, the amp. - Source: Internet
- Some multimeters have a continuity check, resulting in a loud beep if two things are electrically connected. This is helpful if, for instance, you are building a circuit and connecting wires or soldering; the beep indicates everything is connected and nothing has come loose. You can also use it to make sure two things are not connected, to help prevent short circuits. - Source: Internet
- To measure the current through a lightbulb the multimeter becomes part of the circuit and transfers electricity from the battery to the lightbulb. The positive probe of the multimeter (red) is connected to the positive side of a battery while the negative probe of the multimeter (black) is connected to one lead of a lightbulb. The free lightbulb lead is then connected to the negative side of the battery using wire. Current will flow from the battery to the multimeter and then into the lightbulb. - Source: Internet
- A multimeter measures volts, amps or resistance from an electrical source. The instrument fits in the palm of your hand with a digital or analog display and two probes connected with cables. You can purchase low-end multimeters for less than $20. - Source: Internet
- Direct current DC is unidirectional current, unlike AC. Therefore, its direction and polarity matter. If the probes are connected with opposite polarity, it will not damage a digital multimeter but only show a negative “-” sign. But if an analog multimeter is used, the reverse current may damage the meter because the needle cannot deflect in opposite direction and if the voltage is high it may damage it. - Source: Internet
- 4 – The multimeter setting to test a car battery is 20 DC Volts. Set the dial on the meter to 20 Volts DC. This will allow accurate measurement in a range of 0-20 DC Volts, more than enough to capture the batteries capacity within that range. - Source: Internet
- Amps are the amount of current flowing through a device or circuit. A multimeter can help you measure the amount of load an item pulls. This can help you avoid overloading your electrical system. Wires are only rated for so much ampacity and it’s important to not overload them. - Source: Internet
- Direct current (abbreviated DC) is current that always flows in one direction. Direct current is supplied by everyday batteries—like AA and AAA batteries—or the one in your cell phone. Most of the Science Buddies projects you do will probably involve measuring direct current. Different multimeters have different symbols for measuring direct current (and the corresponding voltage), usually “DCA” and “DCV,” or “A” and “V” with a straight bar above or next to them. See “What do all the symbols on the front of the multimeter mean?” for more information about the abbreviations and symbols on multimeters. - Source: Internet
- Most multimeters (except for very inexpensive ones) have fuses to protect them from too much current. Fuses “burn out” if too much current flows through them; this stops electricity from flowing, and prevents damage to the rest of the multimeter. Some multimeters have different fuses, depending on whether you will be measuring high or low current, which determines where you plug the probes in. For example, the multimeter shown in Figure 5 has one fuse for 10 amps (10A) and one fuse for 200 milliamps (200mA). - Source: Internet
- You can use a multimeter to test the voltage of your car battery at home. This is a simple and easy way to check if your battery is healthy or needs to be replaced. Follow the steps above to get an accurate reading of your battery’s voltage. - Source: Internet
 Following are some suggestions for where to begin your search for data on Multimeter 9V Battery Test:
You should try to find how to test a car battery amps with a multimeter-related information from reputable places. Libraries, online resources, and even paid journalists all fall under this category.
- It's crucial to be aware of the various electronic media sources available when researching How To Measure Amp Hours In A Battery, such as Google and YouTube. You may also get info about How To Test Cranking Amps On A Battery on social media sites like Facebook and Twitter.
Following are some suggestions for where to begin your search for data on Multimeter 9V Battery Test:
You should try to find how to test a car battery amps with a multimeter-related information from reputable places. Libraries, online resources, and even paid journalists all fall under this category.
- It's crucial to be aware of the various electronic media sources available when researching How To Measure Amp Hours In A Battery, such as Google and YouTube. You may also get info about How To Test Cranking Amps On A Battery on social media sites like Facebook and Twitter.It’s crucial to read to examine the authenticity of each source in order to acquire the greatest information regarding How To Check Car Battery Amperage With Multimeter.
Video | How To Measure Amps On A Battery With A Multimeter
You’ll learn more about Multimeter Battery Test after watching the films included in this post, which come from a variety of different sources. Information on a wide range of topics can be easily accessed via the internet.
## Notable features of how to check amps on a battery with a multimeter include:- How To Measure Amps On A Battery With A Multimeter
- How To Check Amps On A Battery With A Multimeter
- How To Measure Battery Current With A Multimeter
- How To Measure Amps On A Car Battery With A Multimeter
- How To Measure Amps On A 12 Volt Battery With A Multimeter
With the abundance of How to Use a Multimeter, Part 4: Measuring Current (amperage)-related resources available online, it’s easy to find what you’re looking for.
This is not how most people would expect to learn more about How To Measure Mah Of Battery, so be prepared for some shock value. It paves the way for a closer examination of the Multimeter Setting For 12V Battery information’s actual substance and its potential applications.
 techniques for making Check Battery With Multimeter data visualizations that are both aesthetically pleasing and practically applicable. They can spread the word about how do you check amps on a battery with a multimeter in professional and promotional settings. For this reason, we also include Multimeter Battery Test-related pictures.
At last, this article sums up key points about How To Check Battery Amperage Output. There is also a comparison of your How To Test Cranking Amps On A Battery knowledge to that of How To Measure Amps On A 12 Volt Battery With A Multimeter, as well as a discussion on How To Check Aa Battery Amps With A Multimeter and How To Check Aa Battery Amps With A Multimeter.
