Today’s topic is How Do You Make Resin Shiny After Sanding. Obviously, you can find a great deal of STEPS AND TOOLS TO POLISH EPOXY RESIN TO PERFECTION-related content online. The proliferation of online platforms has streamlined our access to information.
There is a connection between the Best Polishing Compound for Epoxy Resin and Sand Resin information. additional searching needs to be done for how to get resin shiny after sanding, which will also be related to how to make resin shiny after sanding.
126 Tips to How Do You Make Resin Shiny After Sanding | How To Polish Resin
- For a matte finish, you simply sand the surface with 3,000-grit sandpaper. Most oil-based finishes should adhere to the epoxy or at least form a film overtop, which can clear it out after sanding. The optimal grit for most finishes is 320 or higher. Proven brands like Osmo, Rubio, and Odie’s oils/waxes have been used with great success by many customers. This will help to resist moisture while retaining a natural matte look. - Source: Internet
- Epoxy resin is rugged and durable, but it does not mean you can handle it roughly. You may want to fix your scratched or faded patio but do not have experience polishing epoxy before. Instead of taking a risk in polishing the epoxy on your own, it is better to hire professional polishers to do the job. They have all the machines and compounds to fix different problems, - Source: Internet
- If you want to polish your surface by hand, you will again need the sandpaper, sanding block, polishing paste, water and a cotton or linen cloth. Then put some polishing paste on the cloth and moisten it with some water. Then place the cloth over the sanding block. Rub the cloth over the surface in slow, circular movements with little pressure. Your polish is finished when the desired degree of gloss is achieved. - Source: Internet
- Moreover, we understand that sometimes you might be in a hurry and want to start the painting process right after you are done sanding. In that case, make sure that you use an electrostatic cloth that will wipe the smallest of the dust particles off the surface. Once you are done with that, the surface will be completely ready to be painted on. - Source: Internet
- Make sure the surface is even. Fill any cracks or lines with a resin coating to smooth out the surface. Apply the resin liquid with a dropper or dip the material in the resin liquid and leave it to harden. For faster results, use UV light to harden the resin. - Source: Internet
- If the resin has been sanded down, the finish will appear dull and scratched. Use lighter and lighter grit sandpaper until the finish is very smooth. However, It will still be cloudy. - Source: Internet
- For polishing an epoxy resin, first, you need the surface to be smooth and even. For that, use sandpapers of different grits. If the epoxy surface has too many imperfections, start polishing with low grit sandpapers. But if it is comparatively smooth and has fewer imperfections, use high grit sandpapers to clean the surface. - Source: Internet
- In principle, it is possible to carefully polish the surface of almost any type of work-piece or resin sealant for a great shine. Of course, this works easier with a corresponding size of the work-piece or a larger area of the sealant than it might be the case with very small work-pieces with many edges. Epoxy polishing usually works without any problems for the following applications: - Source: Internet
- For polishing larger epoxy resin surfaces, such as sealed floor surfaces or extravagantly designed tabletops, you should use a suitable polishing machine if possible. The difference between a drill and a polishing machine is easy to explain (apart from the possibility of controlling the rotational speed): While the drilling machine rotates only rigidly around an axis, the polishing attachment on a polishing machine moves in elliptical or eccentric movements. This has a positive effect on the result of the polishing process. Especially as a beginner, you can achieve particularly brilliant results when polishing epoxy with a polishing machine. - Source: Internet
- It’s best to apply at least three coats of spray for a smooth, shiny finish. Let the resin spray dry after each coat and keep it away from dust and dirt until it dries completely. Once the spray is dry, wipe it with a clean cloth, and the surface will be shiny. - Source: Internet
- The best way to make your resin clear after sanding is to polish it with a polishing wheel. There are different types of polishing wheels available, and you can use a rotary tool or Dremel for this as well. A polishing compound is also helpful in removing scratches from the surface of your resin piece, and you can clean it with alcohol afterward. - Source: Internet
- Try using a high gloss finish. There are several products available that you can use to coat and polish your resin after it has dried. Some like Envirotex High Gloss Finish, have very good reviews from crafters and artists who have used them before. This can be trickier than other methods as you will need to ensure the surface is completely flat and clean before applying the coating, but it has been known to help with scratches too! - Source: Internet
- To obtain a really perfect and shiny surface, polishing is essential. Here, however, it is important that above all the previous sanding with different grit sizes was carried out carefully. If this is not done carefully, polishing is of no use and ugly sanding marks are left behind. - Source: Internet
- Working in resin lets us create beautiful pieces of artwork. With resin work, we can create pieces for our own pleasure, or this can be the basis of a small business based on our art skills. Creating something beautiful can be immensely rewarding, either to give as a gift or as the foundation of a successful enterprise. - Source: Internet
- In some cases, your work-piece may already have largely smooth surfaces after casting. This is a huge benefit when using silicone molds in particular. In such a case, you can shorten the sanding process easily and sometimes you only need to use a relatively fine grain of sanding paper for wet sanding. Sometimes you can even dispense with wet sanding altogether and continue your work directly with the epoxy resin polish. - Source: Internet
- Tip 1: After a few minutes of patient polishing, doubts often arise as to whether the surface will ever have the desired shine. It is not uncommon, however, that the matt appearance of an epoxy resin surface is actually only due to residues of the polishing paste on the epoxy resin. If, on the other hand, you regularly wipe off these polishing residues with a soft, clean cloth, you will always be able to keep a close eye on the progress of polishing. - Source: Internet
- Once you’ve sanded your resin, you’ll need to polish it. Your best option is clear nail polish because you can easily find it and it works perfectly. But if you don’t have any, use a gloss medium or sealer instead. If those aren’t available either, try a gloss spray paint. - Source: Internet
- While you are working, at no time forget to dip the tip of the sandpaper in the water in frequent intervals. Also, remember to use a circular motion to do the sanding. In case you make horizontal or vertical strokes, the chances are that your surface will get damaged. - Source: Internet
- Moreover, when you are wet sanding, stay very cautious about the material that you are sanding. Even if it has a partial wood composition, it will start to swell within no time, causing permanent damage to the surface. And not just wood, other similar materials will also face the same problem. - Source: Internet
- Shake the can for 1 minute. Remove the lid and hold about 6-8 inches away from the project while spraying. Then spray the resin lightly with the Resin Spray. Do several light coats of Resin Spray, not a heavy coat. Let the resin dry about 10 minutes and then add another coat. - Source: Internet
- You can polish all sorts of epoxy resin crafts such as tabletops, countertops, bar tops, jewellery, and coaster. Apply this polishing compound right after sanding an epoxy craft and see how it makes them shine. Besides, the 3 In 1 Advanced Formula of the polisher can nicely take care of surface scratches of your epoxy crafts. - Source: Internet
- Make sure that you only use colorless polishing paste to avoid any coloring effects on your piece. Further, make sure that after every application you use a separate clean cloth to wash off the polishing paste. Until removed, polishing paste can give an epoxy resin object a matte appearance. - Source: Internet
- Wood and resin projects require dry sanding. The main reason for this is water may cause the wood to swell. As a result, your project could have uneven surfaces. - Source: Internet
- Apart from that, dry sanding can end up producing a lot of heat. And if that happens, then the resin surface will lose its shine. It may also become impossible to fix, meaning nothing will be able to bring back the shine. - Source: Internet
- While crafting with epoxy resin, you apply layers of resin. However, bugs, hair, dirt, or any other imperfections can get into the epoxy during the process. It is better to get rid of these impurities before applying another layer of epoxy resin. - Source: Internet
- Now that you have your resin jewelry clean and looking beautiful again, you don’t want to risk anything else happening to it. You should store it in a protected and airtight place. Using a small ziplock jewelry bag combined with a dark jewelry box is a great solution. If you want to display your resin keepsakes out in the open, do so in an airtight and UV protected glass case. - Source: Internet
- Rub with the cloth in careful circular movements over the surfaces of your resin work-piece to be polished. You should apply light pressure. But don’t be surprised if you notice a visible effect only after some time. It may take a little longer until the surface you are working on finally reaches the desired gloss. - Source: Internet
- Polishing epoxy resin can make your craft look amazing. To have the best glossy effect, you must choose the exemplary polishing compounds, tools, and techniques. The process is affordable and accessible. You can simply polish your epoxy crafts and small objects with a microfiber cloth with your hand or a power drill with a polishing attachment for quick work. You can also hire a large buff machine from a company. - Source: Internet
- It’s much easier (and quicker) to use a buffing machine, although you can’t use all buffing machines on complex resin prints. I would recommend either the Torq Chemical Guys Polishing Kit or the DEWALT Variable Speed Buffer (both available on Amazon.com) for resin, which you can also use for polishing. - Source: Internet
- When you are dry sanding, the most important thing to remember is to clean the residual dust properly. In most cases, the dust is toxic and can severely affect your lungs. Apart from that, if not removed, the paint will not stick well to the surface, and your entire effort will go down the drain. - Source: Internet
- Epoxy is an excellent choice for making floors both indoors and outdoors. The versatility of epoxy resin surfaces makes them suitable for any landscape. Epoxy tiles come in various colours and are incredibly durable. Therefore, they have become famous for outdoor uses. You may use epoxy flooring or tiles for building porches, steps, sidewalks, pool decks, entrances, and driveways. - Source: Internet
- When you are working with resin, it is essential that you follow some steps diligently to ensure the perfect end result. And sanding is an essential step to achieve that. You need to sand the resin surface well to make sure that there are no unwanted scratches or dents left. Otherwise, the paint will not adhere to the surface. - Source: Internet
- Any synthetic resin surface, once hardened, can be polished. Wooden boards, artistic creations, floors, repaired objects, or furniture refurbished with epoxy resin are suitable for this process as long as it is done with care and precision. In general, polishing requires three phases; flattening, progressive honing, and buffing/polishing. - Source: Internet
- Do you love crafting with epoxy resin? Then look no further. The Premium Polishing Compound and Cleaner Kit from the Incredible Solution is an excellent choice for you. This multipurpose polishing compound kit has a cleaner, polishing compound, and a spray attachment. - Source: Internet
- The movements during wet sanding, by hand or with an orbital sander, must be precise and circular. The goal of the first step must be a flat surface. You cannot achieve flatness after the initial step. - Source: Internet
- We know that many people are allergic to dust. And if you are one of them, rest assured that wet sanding won’t give you a hard time. There’s hardly any dust that gets generated in this process, saving you from the trouble of inhaling any when executing this process. - Source: Internet
- When choosing a suitable polishing compound, you may be spoilt for choice given the wide range of different products on the market. The number of different product variants reflects the multitude of possible areas of application. However, there are also polishing pastes with very different coarse or fine polishing grains. In most cases, the simple rule of thumb applies: With polishing pastes for use on wooden surfaces, you can also make epoxy resin shine. - Source: Internet
- Gloss Resin spray can improve the gloss and shine of the resin print. It can also reduce any blemishes on the object’s surface. However, if the print has more visible defects, you’ll have to apply a resin liquid coat instead. - Source: Internet
- Micromesh sanding pads are a great way to polish resin. Though they may look like little sponges, they’re actually made out of firm cloth-like material that you can use over and over again. They come in different colors that each represents a different level of thickness—the lower the number, the finer the grit. In fact, I’ve never had to go higher than a 1500 grit sanding pad! These pads can be used on flat surfaces as well as curved ones (like rings). You can find them online or at craft stores like Michaels or Hobby Lobby. - Source: Internet
- Even wet-sanding comes with its fair share of disadvantages. Because the sanding material is already moist, it absorbs a good amount of dust itself and makes the water muddy. And if you keep using the contaminated water on the resin surface, you will end up doing more harm than good. - Source: Internet
- Moreover, when you are sanding, make sure that you are not too hard on the surface and applying too much pressure. Sanding the same area over and over again with extra pressure will cause irreparable damage on the surface and diminish the shine considerably. When you put paint after sanding, the depression on the surface will become more and more visible. - Source: Internet
- If you don’t have any Resin Spray (which I highly recommend), you can mix a small amount of the resin you used to cast your project. Then use a paintbrush (that you will throw away after using) and paint a light layer over the top of your project. This will add that shine back. Then let it dry again for 24-48 hours in a covered box. You can also pour a thin “flood coat” over the completed, cloudy project. - Source: Internet
- Before you polish epoxy resin, it is crucial to determine the type of resin. There are mainly two types of epoxy resin: hard and soft resin. Polishing different types of resin will require other polishing techniques and polishes. - Source: Internet
- then use the 1200 - 1500 - 3000 Trizact clear coat sanding disc abrasives. Wet on the same random orbital. Only water, no soap needed. - Source: Internet
- If only smaller objects or shapes made of resin are to be polished, it is sufficient to use an ordinary power drill with a polishing attachment suitable for this purpose. Usually, you can choose between polishing discs and polishing sponges in different sizes in the corresponding assortment. With a small polishing ball head, you can even polish very small workpieces mechanically. - Source: Internet
- If your piece has wood, and you’re trying to keep the wood dry (which you don’t have to), or keep the wood from too fine sanding, tape it off. That way, a little water under the tape isn’t a concern, but you can sand the epoxy to a really fine grit, and keep the wood closer to 320-400 for a finishing product. You can always dry the wood quickly after sanding with a blowdryer or heat gun on low (and keep it moving). - Source: Internet
- The sanding process when polishing the resin is quite different from the sanding methods for sprays. You can apply the spray in several coats to cover any blemishes, but the same isn’t possible with polishing. To achieve a smooth and shiny surface with polish, you’ll need to ensure that the surface is 100% smooth and free from imperfections. - Source: Internet
- Now that you have some sanding techniques at your disposal, it’s time to figure out how to polish resin after sanding. The key is to use low grit sandpaper for initial stages of sanding and higher grits as you move through the process. As soon as you get a smooth texture, you can polish the piece of resin. - Source: Internet
- Here’s an example… I poured perfectly mixed resin into this half dome silicone mold. I dripped alcohol inks into them and waited. A day later, I popped them out only to be severely disappointed. They were all foggy. The finish was dull and hard to see the alcohol ink drips inside the orb. - Source: Internet
- Once you have moved up all of the grits of abrasive paper, you will need to use a cutting compound such as NW1 polishing compound, this starts off as a fine grit paste and the more it is worked into the resin, the finer the grit gets. This is the what we used in out river table tutorial online. The TOPFINISH 2 is designed for application AFTER the NW1 to give it the ultra-gloss finish on the resin. - Source: Internet
- Broadly, there are two types of sanding when it comes to epoxy resins, viz., dry and wet sanding. And both these methods come with their own set of advantages and disadvantages. - Source: Internet
- To apply resin gloss spray, first make sure the resin print’s surface is smooth. You’ll need to sand it down before using the spray to avoid lumpy layer lines. Also, make sure the surface is clean and remove any dust from the object before spraying. - Source: Internet
- When polishing by machine, follow the same general steps using a circular on and off motion. However, you should still be careful to use machine polishing only with resin pieces that have cured to a high level of hardness. Soft cured resin objects can warp due to heat or even breaking. A combination of machine polishing and hand polishing can be used for resin objects that have many curves. - Source: Internet
- You can shape your pieces on a 320 grit disc sander, then 400 grit dry (wear PPE designed for dust particulates). From there it’s all wet sanding 600, 800, 1000, 1200, 1500, 2000, etc. up to 3000 (some kits go up to 10,000+grit). - Source: Internet
- There are several types of epoxy resin polishing compound on the market. We recommend that you experiment with each type of epoxy polishing compound available. As previously stated, automotive and wood polishes can work very well with resin jewelry and other small objects. - Source: Internet
- This post may contain affiliate links. We may earn a small commission from purchases made through them, at no additional cost to you. You help to support resin-expert.com - Source: Internet
- Polishing compounds are another great choice for polishing your resin pieces up nice and shiny! These compounds come in sticks that you rub onto a buffing wheel (similar to how you would apply lipstick). The buffing wheels are usually made of flannel, felt, or cotton depending on the brand—again, some brands sell them online while others can only be found at craft stores. You’ll need to attach it to something that spins like an electric drill or Dremel tool. You don’t want your piece moving around too much because it could get damaged by the spinning motion, so try holding it in place with one hand while turning on the power tool with the other hand to avoid mishaps. - Source: Internet
- sand with 800 Abranet. Abranet is a dust-free sanding material. On a random orbital, on high speed. - Source: Internet
- If you want to regularly polish larger areas of epoxy, then the purchase of a polishing machine specially designed for this purpose will certainly pay off. With such a machine you can use different polishing sponges for polishing the resin. Also, the speed of the polishing machine can be adjusted in such a way that an optimal polishing result is possible. With a reduced number of revolutions, you make sure that the surface of your work-piece does not get too hot due to the frictional heat. - Source: Internet
- Hi friends, it’s Natalie from Doodlecraft. It’s happened to even the best resin crafters… a cloudy resin finish. It’s super frustrating to spend all the time and money to make a project only to have the resin finish look dull and not shiny. - Source: Internet
- You want to make sure that you have a smooth, clean surface to work with when polishing. You can do this by working your way through various grits of sandpaper: the lower the grit, the deeper the scratches on the surface. So, if you’re trying to remove a bug, or level out the surface then you are going to want to start with a lower grit and slowly work your way up, until the surface is smooth. If your surface is relatively ready and free of imperfections than you are more likely going to start with a higher grit sandpaper since the surface needs less work. Again, check out our sanding tips prior to polishing so that you’re ready to take on the polishing process! - Source: Internet
- All epoxy resin objects can be polished, but the methods that you use will depend on what kind of object you are polishing. The rule is that softer cured resin objects should be polished by hand, and hard cured resin objects can be polished with a buffing wheel or drill head. Smaller objects should be polished by hand if possible or with a buffing wheel. Hand polishing is the correct option for small objects that have many curves. - Source: Internet
- Actually, there are not many pitfalls lurking in cast resin polishing. Nevertheless, you should always work very carefully and thoughtfully during this step in order to get a nice shiny surface in the end. With the right polishing paste, for example, epoxy resin can be made to shine very well. Further factors for an optimal result are the choice of the polishing sponge used and the set speed of the polishing machine used. - Source: Internet
- In this first step, you start with the sanding of epoxy resin through the so-called wet sanding. First of all, you need ordinary tap water and special sandpaper that is suitable for use in wet conditions. The decisive criterion for this is the application of the abrasive grains on a waterproof fabric that cannot tear when wet under mechanical stress. - Source: Internet
- Before you can buff the resin print, you’ll have to smooth out the surface with sandpaper. Start sanding with rough sandpaper and transition down to fine-grit sandpaper for finishing. To sand the resin print, follow these steps: - Source: Internet
- Resin polish is usually a clear liquid or paste that is used after sanding. Any product that can be used for wood polishing also works great on resin. Various kinds of automobile polish also work very well with resin. You should experiment with test castings and determine what works well on the type of resin that you like to use in your castings. - Source: Internet
- TOP FINISH 2 is precisely what its name suggests. It is a fine polishing compound to be applied after epoxy resin products are crafted. The nano-particle formula of the products makes sure you get an ultra-glossy surface after polishing. You can also use it to bring back the shine of your dull epoxy resin that faded over time. - Source: Internet
- You might be planning to sand epoxy resin on materials that are partially made of wood or any other similar material sensitive to moisture. In that case, it is best to go with dry sanding. This is because if you use any other method, then chances are that the surface might swell up and get blotchy. - Source: Internet
- Today, we will share information and tips concerning how to polish resin. We’ll share ideas on how to use resin polish after sanding, what epoxy objects are easiest to polish, and what the best epoxy polish compounds are. Polishing epoxy resin is easy and will make your artwork shine. - Source: Internet
- Finally, you should know about another product from a brand, the NOVUS Plastic Polish Kit. It is an excellent product for restoring dull epoxy resin full of scratches. It ensures your objects can last for a long time looking beautiful. - Source: Internet
- The resin must be the correct temperature for the correct finish. If it’s too cold, it can affect the finish. To warm up resin, place the bottles of resin and hardener into warm water and let the resin warm up a tad before mixing. The bottles should be warm to the touch prior to mixing. Do not heat it. - Source: Internet
- Essentially, there are 2 ways to sand epoxy resin: Dry Sanding and Wet Sanding. Wet sanding with water-resistant sandpaper is the best way to sand epoxy resin. However, it depends on the type of project. - Source: Internet
- Polishing epoxy resin, like all other steps, is actually an indispensable part of working with epoxy resin in various projects. Only with careful polishing can the shine be created that turns a nice craft idea into a true work of art. But this only works if you lay the foundation for a perfectly polished resin surface by sanding (with different degrees of grain size) before the actual polishing. If unsightly sanding marks are not removed carefully enough during this initial step, even the final polishing cannot produce the desired surface quality. - Source: Internet
- After curing, release from a mold or other applications, epoxy resin may appear dull or contain haze. Here, polishing epoxy resin helps to give the final result that certain something and the necessary shine. The polishing is done in a few steps and makes the cured resin shine properly. We show you step by step how to sand and polish resin. - Source: Internet
- You can choose from a wide range of mineral oils to polish your resin prints. Still, Murphy’s Mineral Oil (available on Amazon.com) is recommended for its unreactivity and smooth effect. - Source: Internet
- There are several different types of resins used for jewelry, and you can’t treat them all the same way. Some resins are very hard and can be polished and shaped with a Dremel tool. Other resins are extremely soft and would be irreparably damaged with those means. If you don’t know what type of resin was used to make your jewelry, you should be very cautious about how you care for it. - Source: Internet
- On the other hand, soft epoxy resins are soft as silicon after curing. You can dent soft epoxy resin with your fingernail. Besides, it becomes softer with body heat. - Source: Internet
- Buffing on the other hand, acts as more of a filler than a remover like sanding. While buffing you are using a compound to essentially fill in the scratches previously made on the surface of your project. You work in the compound with a variable speed polisher, slowly working the material into the surface. You can do one, you can do the other, or you can do both—either way, skipping this step isn’t going to give you the glass-like finish your project deserves. - Source: Internet
- First, make 1 or 2 passes over the resin. Next, remove the sander from the surface. Then, use an air compressor to remove the resin dust from the sandpaper. - Source: Internet
- Mineral oil is a colorless, orderless, toxin-free liquid that you can use to achieve a shiny finish on resin prints. Apply mineral oil after you’ve sanded down the material. Mineral oil won’t have the same sticky effect as resin spray or coating, making it ideal for polishing resin. - Source: Internet
- The product you choose should be easy to apply. You can find polishing compounds in spray bottles, squeeze tubes, and jars. So, pick one that you find convenient to use on the surface of the epoxy resin. - Source: Internet
- The first step is to know which type of epoxy you have. For soft epoxy resin, you can consider less abrasive liquid polishes. Hard epoxy is easy to clean with a bit of abrasive polishing. However, make sure the compound does not contain any chemicals that can harm the glossiness of the epoxy. - Source: Internet
- Now that you have learned how to choose a polish compound, you should know how to make your resin crafts glossy like glass using a polishing compound. Gather all the items required to polish your epoxy resin. The things you will need are: - Source: Internet
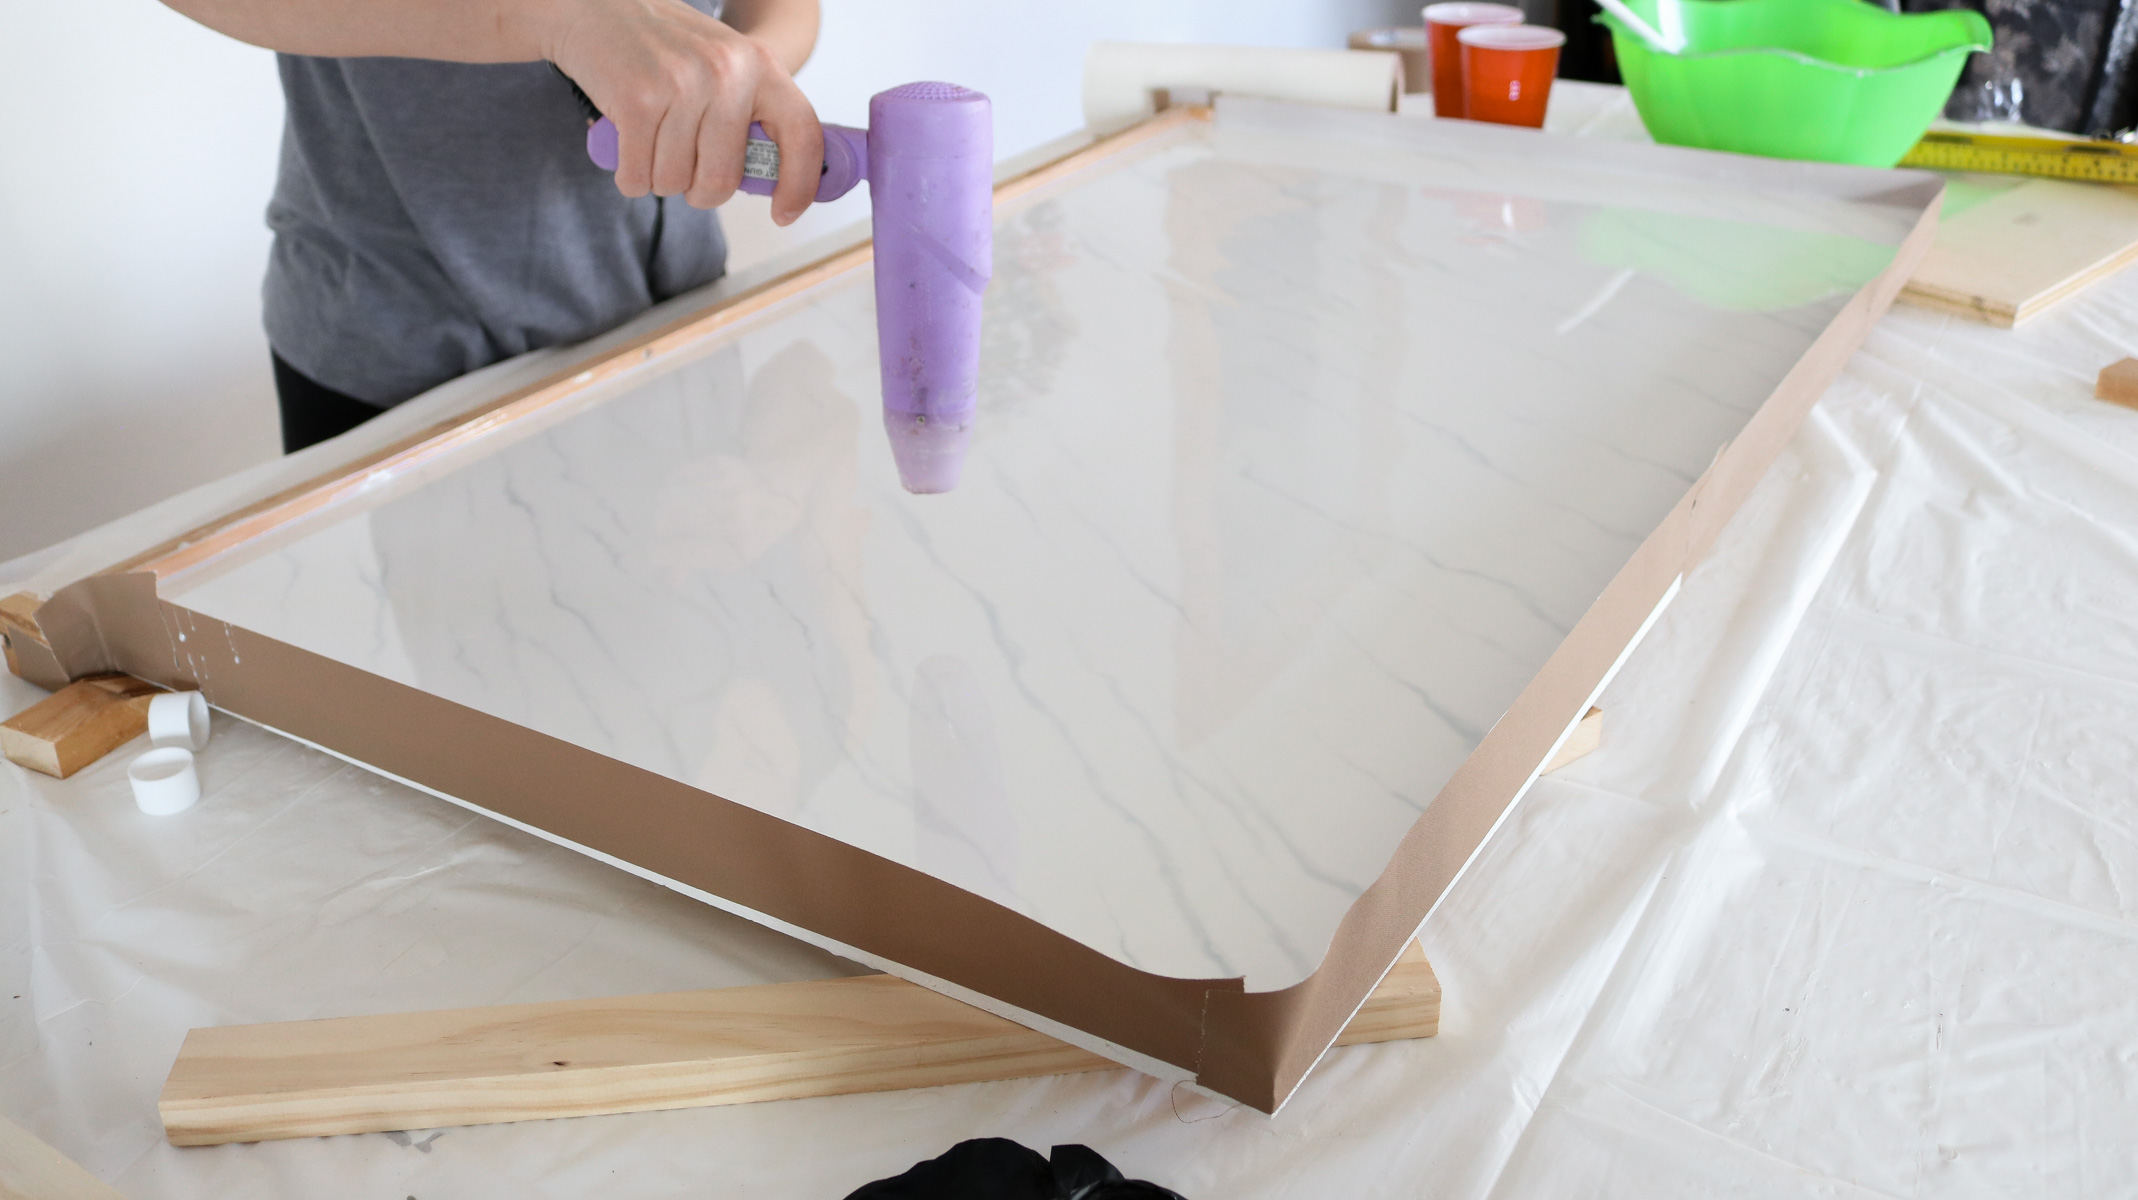
- In this clip, Matt Hutton utilises sandpaper grits ranging from 80 to 600 to demonstrate the quickest and most robust approach for polishing epoxy resin countertops. Pure Acetone is what he uses to clean in between sanding. After that, he does wet sand and polish. He explains pressure in great detail, providing you with a solid foundation to begin your DIY projects. Go check out Matt’s YouTube channel and subscribe. - Source: Internet
- Sanding, Buffing and Polishing, is not always necessary. Sometimes a dome coat or a flood coat of clear resin is all that is needed (and can sometimes be the easiest). In some cases a flood coat vs wet sanding and oil/polish is a matter of preference. - Source: Internet
- When you are dry sanding, it is crucial that you start small. We would suggest that you begin the work with 200 grit sandpaper and eventually increase it to 800 grits. And while working, don’t get surprised if your sandpaper gets clogged. With all the dust, what else do you expect? - Source: Internet
- The mold can play a part in the finish. If the surface of your mold is shiny, the resin will be shiny. This silicone mold is very matte, therefore the resin turned out dull and matte. - Source: Internet
- When sanding, you start with a coarse 120 grit and work your way carefully in circular movements to a fine 3000 grit. You can do the wet sanding by hand without any mechanical assistance. Alternatively, you can also use a random orbital sander. When you have finished wet sanding, the surfaces of your epoxy resin work-piece should be even and smooth. After that, however, the actual epoxy polishing will only begin. - Source: Internet
- There is a wide range of polishing compounds available, which differ in the fineness of the polishing grain contained, and which are also used differently in some cases and have been developed for different materials. We recommend the Polishing Set from Incredible Solutions. This company has a lot of experience when it comes to epoxy resin and their polishing compound with the matching cleaner just gives you the best results - Source: Internet
- Some people even consider sanding for the sole purpose of enhancing the shine of the surface. Whatever your goal is, it is crucial to understand how to sand epoxy resin properly to achieve the desired result. That’s why we have designed this guide with all that you need to know when sanding epoxy resin. - Source: Internet
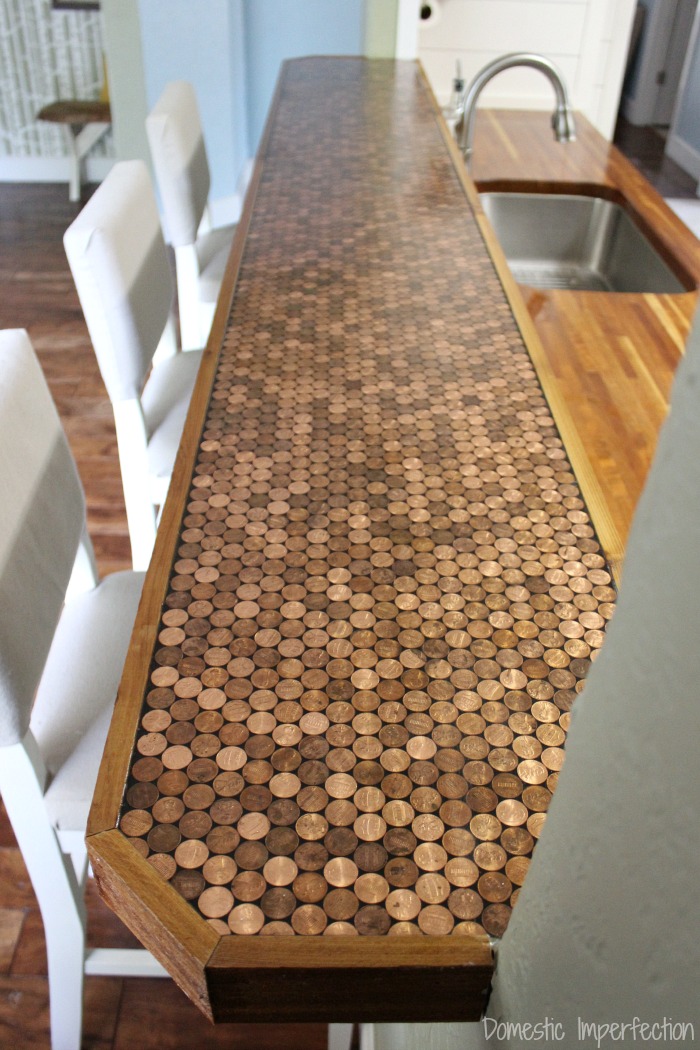
- You can polish your epoxy table, floor, or other epoxy items to make it clean and shiny again. You can polish any cured epoxy resin items and epoxy surfaces with a suitable polishing compound. Epoxy floor and tables are exceptionally durable and rugged. - Source: Internet
- Once your epoxy resin is cured, it does not look glossy. If you want to make a faded or hazy epoxy resin shiny and high gloss finish, buffer it with polishing compounds. For larger surfaces, use buffering wheels. Apply the polish rubbing compound in a circular motion in small parts to avoid marking. - Source: Internet
- Use fine-grit sandpaper to smooth out the surface before polishing the resin. If you notice any blemishes on the 3D resin print before polishing, you can cover them with a resin filler and sand them down once more. Use a polishing machine to achieve a sparkling, shiny finish on the resin print. - Source: Internet
- Use 0000 steel wool and rub in a circular motion. Allow at least 36 hours cure (brand dependant) before rubbing the coating, or it may scratch or mar rather then resulting in a satin finish. A good spray finish to put over this, is Liquitex Soluvar Spray Varnish for the satin finish. Some spray varnishes can react with cured resin, but this one has been used by numerous resin artists successfully. If your painting is going to be hung in a spot where light over high gloss is an issue, or someone prefers non high gloss finish, this is a possible alternative solution. - Source: Internet
- Abrasives are necessary to get your epoxy resin in shape. An epoxy resin table or floor may get deeply scarred. You can remove the marks using abrasives, like grit, sandpaper and sand blocks. Different-grit sandpapers are available to polish epoxy surfaces. Also, there are abrasives in the form of pastes. - Source: Internet
- However, you must be gentle and extra careful while polishing your epoxy resin. If you apply too much force, you may end up damaging the surface or the glossy appearance. You may have to sand deep marks and scratches of your epoxy to remove them. - Source: Internet
- Note: Putting a wax or polishing compound on unsanded resin doesn’t really accomplish much, you have to get the finish to a minimum 3000 grit polished sanding. It’s worth the work. You just lightly sand it with each grit. And you don’t need to spend hours on it with each stage, just enough so that the higher grit removes the scratches from the previous grit. Once you’re done sanding the resin will pretty much be back to shiny again, then the polish will gloss it up beautifully. - Source: Internet
- After you coat or cast and demold your epoxy, you might realize your project has a flaw—a scratch, a hair, a bump, or an uneven coat are all common mishaps that can occur. To fix these flaws, sanding is highly recommended. If you haven’t already, make sure to remove any of these imperfections before moving on to the buffing process. - Source: Internet
- Next, we have another fantastic product from a well-reputed company. The Turtle Wax Polishing Compound & Scratch Remover gives incredible results after polishing epoxy resin. This compound works as both polishing and scratch removing compound. - Source: Internet
- If you’re a crafts enthusiastic, professional artist, or small business person who works in resin, let us help you. Plastic Materials works with arts professionals, and we can answer any questions you have about how to polish resin. Contact us today. - Source: Internet
- If you want to make sure that the sanding process has not left any scratches behind, one thing you need to do is use the proper sandpaper grits. If you sanded too quickly without using enough pressure on your piece then it’s possible that there might be some scratches leftover which will show up when light hits them at an angle. The trick here is patience! - Source: Internet
- Yes, you can use car polish on epoxy. A car polisher will help you achieve a high gloss shine for your finished resin surfaces. You can use a random orbital polisher as long as you don’t go too fast or apply too much pressure. - Source: Internet
- Sand the resin with water-based sandpaper. Wet sanding is an effective way to remove imperfections and scratches, as well as to smooth out the surface of the resin. The grits to use are 1500, 2000, 2500, and 3000. - Source: Internet
- Get comfortable once you have your jewelry and everything you need. Polishing resin jewelry can take some time because you need to do it gently and slowly. When you’re ready, follow these steps. - Source: Internet
- If you have never polished your epoxy resin floor or objects before, you may wonder about the products required to do the job. You will find hundreds of polishes and tools available in the market. Using these products, you can get rid of dirt and scratches from the epoxy. There are also polishing compounds to keep your epoxy glossy. - Source: Internet
- Before you polish or spray the resin print, you’ll need to make the surface smooth. You can do this by sanding it down and applying a primer (in the case of acrylic paint). So, there’s no need to settle with dull 3D prints when you can make them stand out with a glossy surface. - Source: Internet
- If you need a reliable acrylic spray, I recommend Aleene’s Acrylic Gloss Finish Spray (available on Amazon.com). It always adheres well to my resin prints, and it leaves a gleaming finish. - Source: Internet
- Acrylic paint is one of the best finishing materials to make resin glossy. It’s durable, easy to apply, and won’t damage the object’s surface. Acrylic spray paint is ideal for getting a different colored effect on the resin surface, but you can always opt for a clear coat. - Source: Internet
- Polishing your resin prints can give it a shinier finish, provided you use the correct polish. However, polishing only works well with fine sandpaper. You’ll have to spend more time polishing your 3D resin prints, but the result is worth the effort. - Source: Internet
- Epoxy resin can be toxic if you work with it regularly. Constant exposure can cause many side effects. Put on appropriate protective gear to ensure your safety. - Source: Internet
- Large areas can be polished to a high gloss most quickly with a polishing machine. A random orbit sander with polishing attachment is the first choice for epoxy resin surfaces. Due to its eccentric movement, you will achieve a perfect polishing result without removing too much resin. To do this, apply some polishing paste to the polishing pad on your sander. Turn the machine on and move it in circular movements with little pressure over the surface until the desired gloss level is achieved. - Source: Internet
- When you’re prepping to polish, you’ve got to sand down your surface. You can choose either wet sanding or buffing to achieve this. With wet sanding, you’re carefully sanding from coarse grit to grit, going from 120 to 1000 in circular movements, either by hand or with an orbital sander. When getting up to the highest grit, you may find your epoxy is polished enough to your likening. - Source: Internet
- Resin is a durable, versatile, non-reactive material widely used by 3D printing enthusiasts since resin is perfect for printing colored objects and complex models. However, the resin can be dull or have a matte surface with slight imperfections. So, how do you make resin prints smooth and shiny? - Source: Internet
- Many resin craftsman, say they will not leave dribbles down the sides, or attempt to spray coat with cloudy varnish. Sanding, cutting then polishing is considered the professional finish, by many. Yes, it is a ton of work. - Source: Internet
- Want your faded epoxy resin shiny and beautiful again? Then you will need to use some polishing compounds. There are two polishing compounds for epoxy resin- liquid and paste. Both forms are simple to use. - Source: Internet
- Resin spray is an easy way to apply a glossy surface to your resin prints. It comes in many colors and doesn’t require specialized machinery to use. However, it can be sticky and requires special care to avoid catching dirt and dust. You’ll also need to smooth the surface with sandpaper before spraying, which can be a tedious process. - Source: Internet
- Before spraying the object with acrylic paint, prime the surface first. To prime the resin surface for spraying, sand it down with 1000 Grit sandpaper and ensure it’s clean. Then, apply a coat of spray primer and sand it down with medium-grit sandpaper before applying another coat of primer. - Source: Internet
- Fill a container with water or use a water sprayer Dip the sandpaper into the water and start the sanding process It is also possible to apply some water by hand on the surface Between sanding operations, you can wipe off the milky water with a cloth Make sure that the sanding marks become less and less or finer with each change of grit. Scratches still existing from the previous sanding process cannot be removed later. Finally, you can wipe off the water completely - Source: Internet
- Polishing epoxy resin with a polishing machine is especially suitable for larger surfaces, such as epoxy resin tables, smaller floor surfaces, tabletops and similar products. Due to the eccentric movement you will get an excellent polishing result. Instead of only a rotating movement, the polishing pad moves in an elliptical path on the eccentric polishing machine. This is especially recommended for beginners, as a regular gloss is easier to achieve. - Source: Internet
- To polish a hard epoxy resin surface, you can use a buffing wheel with high-power and abrasive compounds. However, you must be extra cautious regarding soft epoxy resin pieces since they could melt just by exposure to low heat. You need a lighter polishing process. As for a large area or surface, use a low-power polishing machine with circular motions, but it is better to use your hands for soft epoxy objects, not too much pressure. - Source: Internet
- Sand the defected layer of epoxy resin to take care of the issues and then apply another coat of polish. After that, cover the layer with a dust cover to avoid getting dirty again. By doing so, you will get a clean and perfectly cured epoxy resin mould. - Source: Internet
- According to some of the best casting epoxy artists, when resin is polish sanded, it has such a different feel to it then unpolished resin. It feels like glass and looks amazing. They swear it is worth the extra effort. - Source: Internet
- I’m working on a project that requires very transparant parts. I already printed the parts on my Form 2 using Clear Resin. I washed them in isopropyl alchohol and post cured them. Afterwards I started wet sanding very thoroughly from 320 to 1500 and plan on sanding to 2500. - Source: Internet
- Resin prints become cloudy because of impurities in the resin filament. It could also become dull if left in the sun, handled too much, or exposed to moisture during printing. In some cases, resins naturally have a matte or murky color. - Source: Internet
- When hard resin cures, it turns hard like plastic. Resins such as polyester and polyurethane are hard when they cure. Casting epoxies have hardness like glass after drying. - Source: Internet
- Your epoxy resin will look pale for a few reasons. It may happen because of humidity, resin temperature, and faulty mould texture. If you want to avoid dull epoxy, avoid working in a place that has high humidity. Also, make sure the mould is clean and completely dry before sanding. - Source: Internet
 Following are some suggestions for where to begin your search for data on how to make resin shiny after sanding:
You should try to find how to get resin shiny after sanding-related information from reputable places. Libraries, online resources, and even paid journalists all fall under this category.
- It's crucial to be aware of the various electronic media sources available when researching Sand Resin, such as Google and YouTube. You may also get info about how to make resin glossy after sanding on social media sites like Facebook and Twitter.
Following are some suggestions for where to begin your search for data on how to make resin shiny after sanding:
You should try to find how to get resin shiny after sanding-related information from reputable places. Libraries, online resources, and even paid journalists all fall under this category.
- It's crucial to be aware of the various electronic media sources available when researching Sand Resin, such as Google and YouTube. You may also get info about how to make resin glossy after sanding on social media sites like Facebook and Twitter.It’s crucial to read to examine the authenticity of each source in order to acquire the greatest information regarding STEPS AND TOOLS TO POLISH EPOXY RESIN TO PERFECTION.
Video | How Do You Make Resin Shiny After Sanding
You’ll learn more about 5 Simple Tips for Sanding Epoxy Resin after watching the films included in this post, which come from a variety of different sources. Information on a wide range of topics can be easily accessed via the internet.
## Notable features of Wax Epoxy Resin include:- How Do You Make Resin Shiny After Sanding
- How To Make Resin Shiny After Sanding
- How To Make Resin Shine After Sanding
- How To Get Resin Shiny After Sanding
- How To Make Epoxy Resin Shiny After Sanding
With the abundance of Sand Resin-related resources available online, it’s easy to find what you’re looking for.
This is not how most people would expect to learn more about How To Make Resin Prints Glossy or Shiny (8 Methods), so be prepared for some shock value. It paves the way for a closer examination of the Wax Epoxy Resin information’s actual substance and its potential applications.
 techniques for making Sandpaper For Resin Polishing data visualizations that are both aesthetically pleasing and practically applicable. They can spread the word about How To Polish Resin: A Step-by-Step Guide in professional and promotional settings. For this reason, we also include How To Make Resin Shiny After Demolding-related pictures.
At last, this article sums up key points about How To Make Epoxy Resin Shiny After Sanding. There is also a comparison of your How To Make Resin Shiny Without Polish knowledge to that of Resin Top Coat After Sanding, as well as a discussion on Best Polishing Compound for Epoxy Resin and Resin Top Coat After Sanding.
